Posts Tagged 'ASP.NET'

Visual Studio 2013 GitHub Source Control

I posted here a while back on using GitHub with Visual Studio 2010. It was a fairly involved process using a third party plugin. Well now you can integrate with GitHub directly from Visual Studio, and it’s much, much easier. I used it yesterday to make my DataAnnotationValidator (blogged about here) available on GitHub for anyone who wants to use it – and, hopefully, so I can collaborate with others on developing it.

Although GitHub integration is now easier, it’s still a trek through unfamiliar and somewhat confusing screens, so I thought it might be helpful to put together a beginner’s guide to working with GitHub and Visual Studio 2013.

First things first – if you’re not already a member, join GitHub. Then you’re ready to begin. I happen to need to put together a little Web Forms / DynamicData demo for a customer, so I’m going to use that project as my example (and then take it down again so I don’t clutter up my GitHub page) .

I created an ASP.NET Web Application and ticked the ‘Add to source control’ box.

Then I chose Web Forms and got rid of authentication as I don’t need it for the little demo I’m putting together.

The next screen asks you what kind of source control you want. Obviously enough, the answer for us is Git:

Now you want to click on the Team Explorer tab under Solution Explorer.

That takes you to the following view and encourages you to download the command line tools. I’ll leave that up to you and focus on the Visual Studio integration:

Now it’s time to setup what’s going to be stored on Git, and what isn’t. I see no point in storing the external packages, so I want to exclude them. Click on the Changes option and you see an interface which initially assumes everything is going to be stored on Git:

I selected the packages folder, right-clicked and chose exclude:
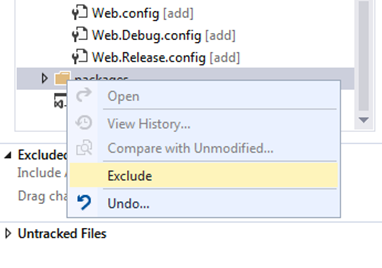
 

So now I have a list of included and excluded changes:

It’s time to enter a commit message and then click Commit… Except that you need to set up your email address and user name first:

Click on the Configure link and it takes you to a screen where you can enter your details. Notice, it also includes a couple of ignore rules for Git-related files:

So with that set up, we can fill in a commit message and commit our changes.

This commits them to our local repository, so we’ll get a dialog re. saving the solution:

And now we’re finally ready to sync with Git:

We click on the link to go to the Unsynced Commits page, and enter the URL of our destination repository:

Except we don’t yet have a repository on GitHub. So next we need to open up a browser, go to GitHub, sign in and click on the Add | New Repository link.
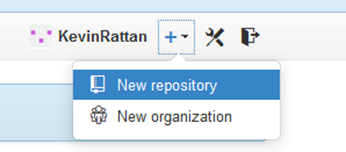
I created a DynamicDataGitDemo public repository (as you have to pay for private ones, and I’m only really interested in GitHub for open source projects). I also chose not to add a ReadMe or a license just yet, as we want an empty repository for Visual Studio. We can always add a ReadMe and license later on.

And finally we have a repository and we’re ready to upload our source code:

For that, we need the https link that’s available on this screen (and later, elsewhere in the interface).

So we copy that into Visual Studio and then press Publish:

Which, not unsurprisingly, brings up a dialog asking us to provide our credentials (which we won’t have to do again if we allow it to remember them):
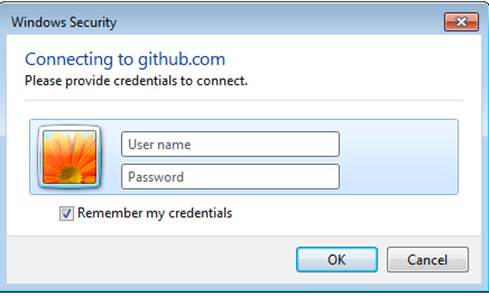
And that’s it. Enter your GitHub username and password, click OK, and your source code is saved to GitHub.
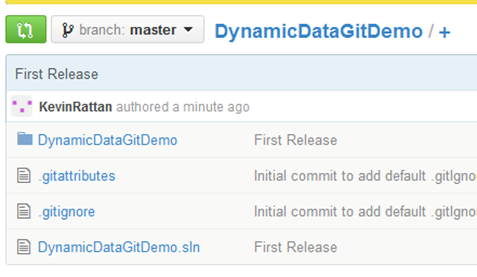
From that point on, you can push changes up from your local repository, or pull down changes from GitHub. On my DataAnnotationValidator project, I added a ReadMe file and a license via GitHub’s browser interface (the latter as a text file, as the tool only generates one on initial creation) and then used Visual Studio to pull them down to my local repository, as well as subsequently adding changes locally and pushing them back up.

Overall, it’s a lot less fiddly than it used to be – as are so many other things inside VS 2013.

Kevin Rattan

For other related information, check out these courses from Learning Tree:

Building ASP.NET Web Applications: Hands-On

Building Web Applications with ASP.NET MVC

Internationalizing ASP.NET Web Forms

I was in Rockville last week, acting as the BORG (Back Of the Room Guy) for another instructor. About half the students were attending remotely, using Learning Tree’s AnyWare system – and one of them was joining us all the way from Sweden, which meant he had a different keyboard layout. Fortunately, that was easily fixed… but it got me thinking about the issue of internationalization.

I go backwards and forwards between the US and UK and as a result I’m very conscious of the differences  between British and American English. One of the big issues is keeping straight whether 1/6/2013 represents Jan 6 (US) to 1 June (UK). It’s all too easy to use the wrong one in the wrong country – but so long as I remember which country I’m in, I normally manage okay.

But what about the web? If a user enters 1/6/2013 – what date do they mean? If the web page shows the date 1/6/2013, what does the user think it means?

The answer, of course, is that we can’t know – the user could be anywhere any speak any language. So we need to internationalize our applications. Fortunately, ASP.NET makes this very easy to do.

Here is a standard contact email form. Currently, it’s English only:

And here is the underlying markup. It’s a FormView control using Model Binding:

At the moment, everything is hard-coded. We want all the text (Name, From etc.) to change depending upon the browser’s language settings. For this we need a resource file. Fortunately, Visual Studio will create it for us. Just make sure you have focus on the page in question and go to TOOLS | Generate Local Resource. (If you’re using VS 2012 and you can’t see the option, try switching between design and source views and clicking in the page: it can be a bit temperamental).

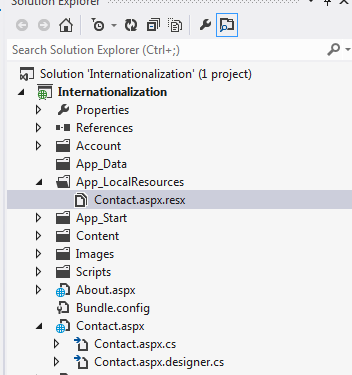
This generates a resource file with the naming convention [FormName].aspx.resx inside the App_LocalResources folder (which will be created if it does not already exist). Our page is Contact.aspx, so the file is Contact.aspx.resx:

This is the generated resource file, which as you can see has all of our original text.

This resource file is then mapped to our controls through markup. Note the meta:resourcekey attributes that have been generated by the designer.

So far so good – but we still haven’t added any internationalization. What we need to do now is to copy our resource file and give it a conventional name that includes the language and country codes. I’m going to create a French version of my form, so I need to call it Contact.aspx.fr-FR.resx or if I wanted to use one version for all French speakers regardless of location, Contact.aspx.fr.resx

And then I need to create all the French versions of the strings. I don’t speak French, so this is part googling, part guess-work: my apologies to any actual French speakers….

Now if the user arrives at the site with French settings, they automatically get the following:

As you can see, it’s not at all difficult to internationalize your web applications. You can also use global resources, and you can of course internationalize MVC apps as well, and you probably want to give the user the option to change the language… and I may just come back to those topics in another post.

Kevin Rattan

For other related information, check out this course from Learning Tree:

Building ASP.NET Web Applications: Hands-On

New ASP.NET Training Course at Learning Tree

I was back in Learning Tree’s Reston offices last week, presenting the beta of my new ASP.NET course – Building ASP.NET Web Applications: Hands-On.  (The beta is part of our course development process where we try out the course in front of students for the first time.  Their feedback is an important part of refining exercises and slides to make sure that everything is clear, that all the exercises work as written and that we have the right balance of material).

I’ve been busy writing the course over the past few months, which is why this blog went very quiet for a while. The new course takes you all the way from explaining What is ASP.NET? through to building a multi-layer application using Code-First Entity Framework, the Web API and the HTML5 Geolocation API. (I put the course example online, so if you want to see what we build during the week, check out www.learningtreatz.com).

What’s so exciting about the new course? (Apart from the fact that I wrote it, of course…)

Well… there’s Visual Studio 2012….

A lot of people aren’t keen on the new monochrome look and – horrors – capitalized MENU items – but there are some really nice new features like Page Inspector and the new improved Add Reference dialog. Beyond that, it remains a very powerful development environment that makes web development a pleasure. And it means, of course, that we can develop with .NET 4.5 – and that means access to a host of cool new features. There’s the Web API:

And bundling & minimizing – which both reduces the size of your .css and .js files for production and makes sure that all your small files are combined into a single  large file, which is a big help in reducing download times for the client:

And there’s also out-of-the-box support for HTML5…

The class covers all these and more, and takes attendees from creating a simple Web Form at the beginning of the class right through to building a layered application with a Code-First Entity Framework data access layer, a business layer calling IQueryables in the data access layer and a UI that uses everything from combining Model Binding with the ListView through to providing an alternative jQuery Mobile view of the entire web site. So if you’re new to ASP.NET Web Forms or just want to refresh your skillset, why not give it a try!

This is me in full flow at the front of the class…

And helping an attendee with one of the exercises…

Kevin Rattan

For other related information, check out this course from Learning Tree:

Building ASP.NET Web Applications: Hands-On

Dependency Injection with Ninject and MVC 4

This week I uploaded a new version of www.cocktailsrus.com. I didn’t change all that much… just upgraded the server to .NET 4.5, upgraded MVC4 from beta to release, Entity Framework to 5.0, jQuery to 1.8.3, jQuery UI to 1.9.2 and jQuery Mobile to 1.2.0. Oh, and I finally made the move to storing the images on Amazon S3 (and, of course, I wrote a program to upload all the existing images ready for the new version).

So, not much change at all, then 🙂

I’ve been itching to make this change for a long time, but now that I’ve done it I have a potential problem: the production and development versions are using different data store types for images. I want to make sure that if I’m in debug mode I call the local file storage version of my PhotoRepository, and if I’m in release mode (and hence on the live server) I am using Amazon S3. There are all sorts of primitive ways I could manage this. I could, for example, change the using directive when I switch versions, going from cocktails.storage to cocktails.storage.amz. But all such approaches are fiddly and prone to human error. What I really want is an automated solution that picks the right object automatically without my intervention.

It’s time for dependency injection!

There are a number of DI frameworks available for .NET, but I decided to go with Ninject (since it looked a. reasonably simple and, b. sufficient for my purposes). Here is my design goal:

The application should automatically select the correct PhotoRepository depending upon whether it is in debug or release mode.

This is what I did to achieve it:

  1. Use NuGet to install the base Ninject framework and the MVC extensions into the MVC project

Don’t worry that it says MVC3 – it works in MVC 4 as well.

This will add a NinjectWebCommon file to App_Start. You could use this, but I did all my work inside Global.asax instead, so I excluded NinjectWebCommon from the project.

  1. Inherit Global.asax from NinjectHttpApplication instead of just HttpApplication and implement protected override Ninject.IKernel CreateKernel() and the override of OnApplicationStarted (which you might have to add yourself).
  2. Move all the code setting up routes etc. from the Application_Start routine to OnApplicationStarted and then remove Application_Start
  3. We’re now ready to start programming. Move to CreateKernal() and create a standard kernel. Then load the executing assembly.

  1. At this point, all the plumbing is in place – we can start setting up our dependencies. What I really want to do is set a dependency on the business/service layer – but for that I first need to create the dependency from the controller to the Service layer. So let’s add a mapping between IBeverageService and the BeverageService implementation:

Except, of course, I don’t actually have an IBeverageService interface because I haven’t needed one before now.

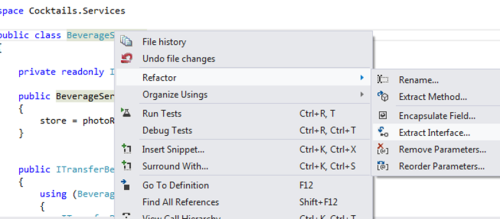
  1. So before I do anything else I have to refactor and create the appropriate interface

.

  1. Not only does that work, I can get Visual Studio to do all the heavy lifting for me. So I go right on and create interfaces for all of my Service classes.
  2. Now that I have interfaces, Ninject will look for the constructor with the most arguments in the specified implementation and use it to create the objects. So now I need to add constructors to all of my service methods so that Ninject can pass in the concrete implementations at runtime. I can then assign them to private read only variables. Like this:

  1. So now I need to tell Ninject which PhotoRepository implementation to use, and since I want different ones between development and production, our old friend conditional compilation can be really helpful here:

  1. Great. We can now pass through the appropriate PhotoRepository implementation to BeverageService. But first we have to add an appropriate constructor to our controller so that BeverageService itself is injected appropriately:

  1. And that’s it. Now when the application runs, Ninject is injecting the types specified inside my Gobal.asax – and giving me the appropriate image storage implementation. Here is the complete code for the CreateKernel() method with all the Service implementations assigned to the appropriate interfaces.

What do I like about this? The fact that my service layer does not even have to have a reference to either storage .dll, and that my application automatically switches to the appropriate back-end depending on the context.

What do I dislike about this? The fact that my UI, which previously only knew about the Service layer and was completely ignorant of the rest of the system now needs to have references to all the objects I might potentially inject. Is it a price worth paying? Definitely.

Kevin Rattan

For other related information, check out this course from Learning Tree:

Building Web Applications with ASP.NET MVC

Google Coding Style Guides

Google have made their internal coding style guides publicly available. I’ve been checking out the HTML and CSS and JavaScript guides over the past couple of days, and would strongly recommend that anyone working on the client-side take a look at both.

Guides like these are full of little tips and tricks. They give you confidence that you’re doing something the right way – Hey look! Google agrees with me! – and you’ll always find some little optimization you haven’t come across before. In this case, I had a definite case of old-dog-taught-new-trick, and also an incredible sense of déjà vu: at least one of the techniques suggested in the HTML guide is a naughty little cheat from years ago (actually, last century) turned into an ultra-modern performance optimization.

Teaching an old dog new tricks

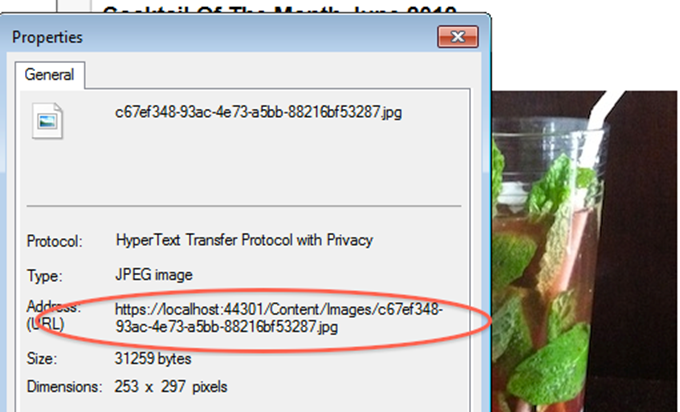
Little more than a week ago I wrote an article for this blog about the SSL features in IIS Express/Visual Studio 2012. Part of that article suggested a way to switch between http and https for images stored on a third party site using an action filter. The HTML style guide suggests a much simpler solution – a form of relative pathing I’d never come across before: simply omit the protocol from the url. Instead of a path like src=https://localhost:44301/Content/Images/1.jpg you use src=//localhost:44301/Content/Images/1.jpg. This makes the path relative and substitutes the appropriate protocol automatically. It relies on the images being available in both formats – but it is massively simpler than my original solution. Time to go back and refactor.

Teaching a new dog old tricks

Way back when the internet was a lot smaller and slower than it is nowadays and everything was in black and white (okay, I made that bit up), we sometimes used to cheat to reduce bandwidth. I remember building an online shop for a small web development company in the 1990s where we had one page with a long table listing all products. We saved more than 100kb (a massive amount of bandwidth back then) simply by omitting the closing </td> and </tr> tags. That was naughty even then, but worth it. Since then, of course, it has been completely verboten because it’s such a horrible breach of the rules. Well guess what – that’s exactly what Google recommends!

Here, for example is what they don’t recommend:

<!DOCTYPE html>

<html>

<head>

<title>Spending money, spending bytes</title>

</head>

<body>

<p>Sic.</p>

</body>

</html>

And here is what they do:

<!DOCTYPE html>

<title>Saving money, saving bytes</title>

<p>Qed.

To be fair, they do suggest being cautious on that one – but still: wow! That’s such a sea-change in approach I find it hard believe it’s going to be accepted any time soon, if ever.

Whether you agree with everything in there or not, the guidelines are definitely worth a look. There’s plenty of food for thought in there and you never know, you might pick up a new trick or two like I did.

Kevin Rattan

For other related information, check out these courses from Learning Tree:

Building Web Applications with ASP.NET MVC

Building Web Applications with ASP.NET and Ajax

Working with SSL at Design Time with IIS Express

One issue that arose from my planned switch to serving images from Amazon S3 was: how to deal with HTTPS?

Hitherto, that’s been a non-issue. I used a relative path for images so the switch between HTTP and HTTPS happened automatically and painlessly. Now, of course, there is a potential problem. I have to use fully qualified paths for the images – and if an HTTPS page tries to serve images over HTTP, the browser will give the end user a warning about mixed content. So what to do?

The solution, of course, is to switch the images over to HTTPS along with the rest of the page. S3 supports HTTPS, so that’s fine – but there are still a couple of questions:

  1. How to manage switching over to HTTPS?
  2. How to test it in the development environment?

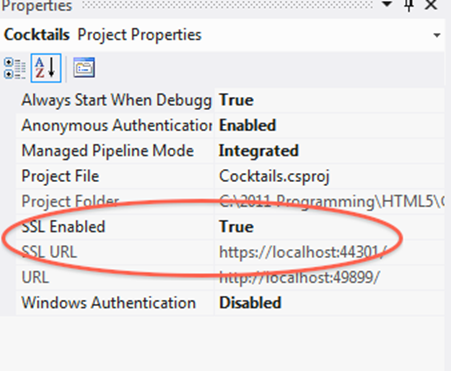
I’ll deal with the second one first. One of the nice things about Visual Studio 2012 is that it comes with IIS Express as the development server. That means you can use and test HTTPS/SSL during development. All you have to do is select the website in Solution Explorer and then change the property setting to enable SSL.

properties window

That’s it. Now, if you browse to the alternative URL you have HTTPS. You’ll get a warning message because there’s no certificate, but the functionality is all there.

So now we can write code to switch to HTTPS for images and test whether it actually worked.

I decided the easiest thing to do was have two configuration settings – one for standard images and one for HTTPS images. Here is the main configuration for the development setup (I left HTTP as relative, and just switched to a full path for HTTPS):

configuration

And here is the configuration transform for deployment to the live setup:

configuration transform

Now the question is – where to pick this up? In the current/old version, I set a ViewBag variable inside the base controller’s constructor. I can’t do that now because I need to find out whether the request uses HTTPS… and the context is not available inside the constructor. So it’s back to the drawing board. I don’t want to have to repeat the code, and I can’t use inheritance to get what I want… so it’s time for attribute based programming – in this case, with an action  filter. As the View is about to execute I check if the Request is over HTTPS, and switch the path appropriately.

Code sample OnResultExecuting

I’m checking that this is a ViewResult, so I can safely add this as a global filter without have to worry about methods that don’t return views:

Code sample register global filters

So now when I switch over to HTTPS, my path switches appropriately, and I don’t get annoying messages about delivering mixed content:

working ssl

Kevin Rattan

For other related information, check out this course from Learning Tree:

Building Web Applications with ASP.NET MVC

Building Web Applications with ASP.NET and Ajax

Configuring Amazon S3 to Serve Images

In my last post, I looked at how you can use the AWS SDK to upload images to Amazon S3 (Simple Storage Service). The only problem is that the storage bucket is private by default. If you try and access your image, even through the AWS interface, you get the following error:

access denied xml

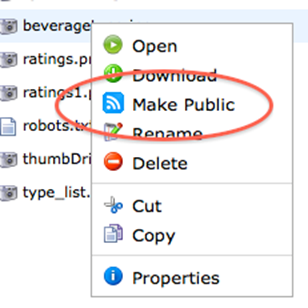
You can make the individual files public – but this is hardly a practical solution for a web site with dynamically uploaded images. I want to have all the images be public by default – not to have to write code to make them public one by one:

make public option

Fortunately, it is possible to make your bucket public by default. Right click on the bucket and select properties.

bucket properties link

This will open a new pane showing the permission options. Click on Add Bucket Policy to open the bucket policy window:

properties details

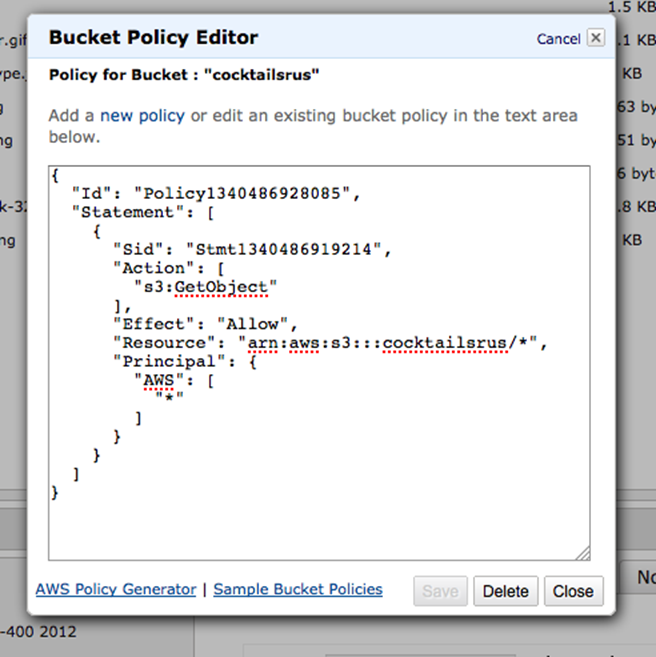
Then, inside the modal window, click on the AWS Policy Generator link:

bucket policy editor

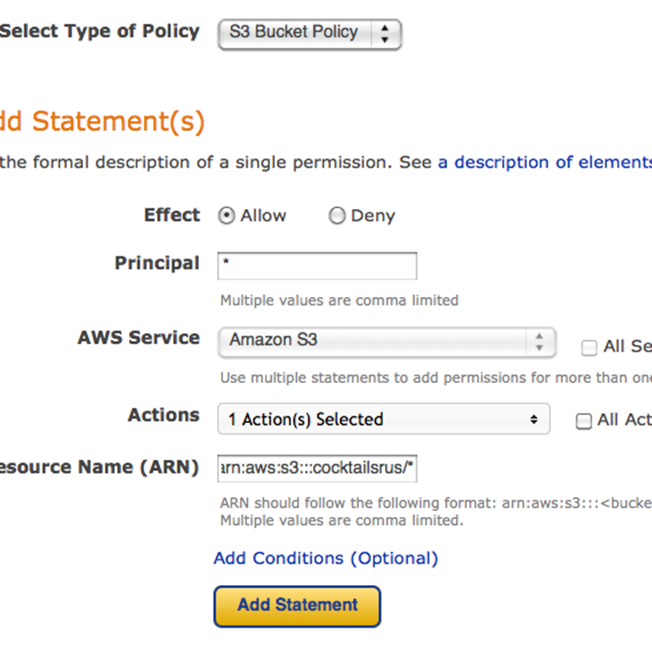
The generator requires you to fill out a form and then writes a policy for you. The only complications are 1) deciding what permissions to allow and understanding what the options mean (for reading your images you want to expose ‘GetObject’), and 2) what your ARN name is. This is in the form arn:aws:s3:::<bucket_name>/<key_name>. In my case, that means arn:aws:s3:::cocktailsrus/*.

Here is the form:

bucket policy generator

Once you click “Add Statement” you’re given a button to Generate Policy – and that generates the policy text for you to paste into your bucket policy:

bucket policy

Once you’ve saved this policy, clicking on the link in the online tool shows you the image. All the images in your bucket are now public.

Unfortunately, that means EVERYONE can see them – including search engines and other web sites. I know S3 is cheap, but I still don’t like the idea of paying the fees for search engines or other websites showing my images. So how do I stop them?

We can stop the search engines easily enough with a standard robots.txt file in the bucket telling them not to index its contents:

User-agent: *

Disallow: /

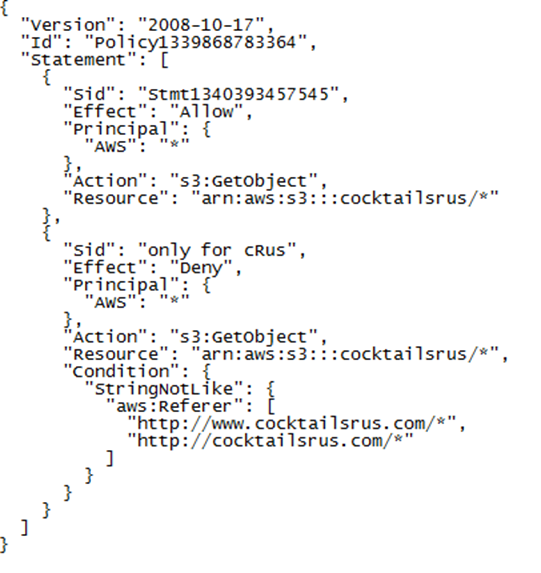
Now all we have to do is stop hot-linking so we’re not paying for someone else’s use of our images. The answer to this is to refine the policy file so that it only serves images to people who are coming from (in my case) www.cocktailsrus.com. Sadly, the AWS policy generator isn’t much help with this, as it doesn’t seem to include an option to test against the referring web site. But while it’s not in the generator, there does seem to be such an option. I found the solution here and implemented it on my bucket.

refined bucket policy

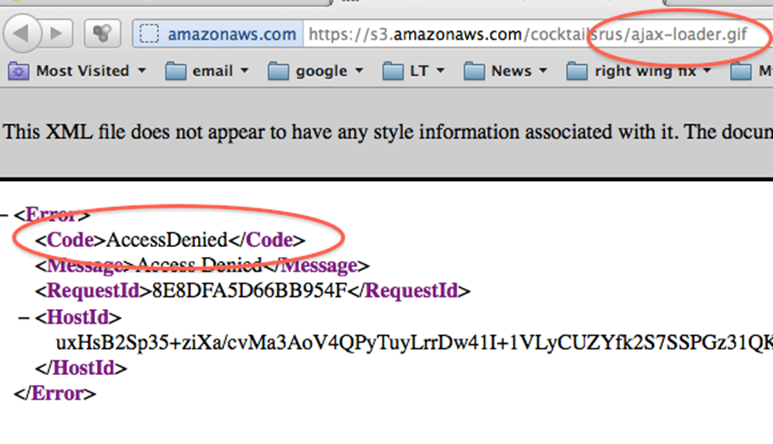
Now, if I try and access my Ajax loader image via the link in the AWS online tool (i.e. NOT via cocktailsrus), I get the familiar XML message:

denied by non-referral

But if I access it via a test page on cocktailsrus.com, I get the image:

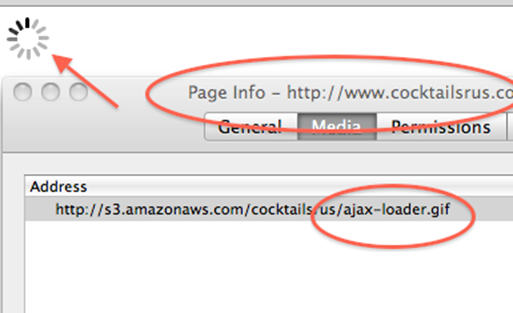
working image

So, the images are now public, but only work if accessed via cocktailsrus.com – and I have a solution that will work when I move over to a web farm, unlike storing images to the file system.

Kevin Rattan

For related information, check out these courses from Learning Tree:

Cloud Computing with Amazon Web Services

Building Web Applications with ASP.NET MVC

Serving Images from Amazon S3

One issue that’s been nagging me as I refactor www.cocktailsrus.com from a RAD site focused on jQuery Mobile to a properly architected site that just happens to use jQuery Mobile is the way I’ve been storing images on the file system. The file system approach is quick and easy and doesn’t clog the database with lots of BLOB data… but it’s also not at all future proofed for moving to a web farm environment. I don’t want to have to deal with synchronizing files across multiple servers, so what to do?

In the old days (like, maybe last year) I’d probably have bitten the bullet and saved the images into the database. But these days we have so much more choice – and since I’m hosting on Amazon EC2 and using Amazon’s easy mail service, then the obvious step is to use Amazon S3 (Simple Storage Service).

S3 isn’t just for images – you can store anything you want – but it makes a natural choice for image hosting. (You can also store your private files there if you want – S3 is private by default). With your images in S3, all your web farm servers are saving to the same place so there’s no longer any need to synchronize between servers – and, as usual with AWS, it’s very cheap.

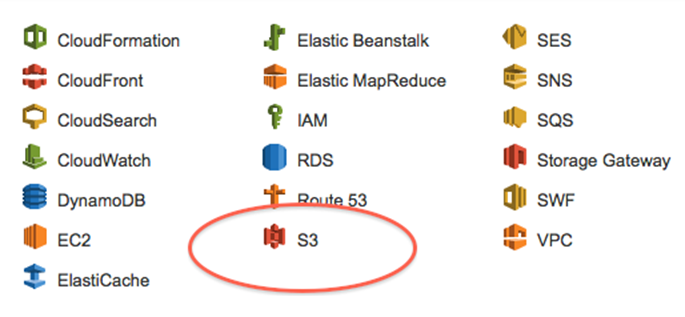
You need to sign up with AWS to get an account. Then pick S3 from the bewildering array of services available.

amazon AWS services

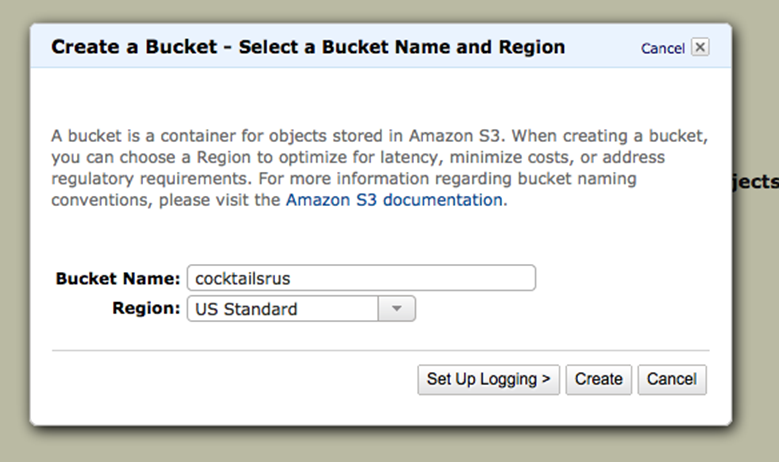
Once you’ve signed up for S3, you can then create a bucket (don’t pick a name with a dot in it – that just makes life more complicated later on).

creating a bucket

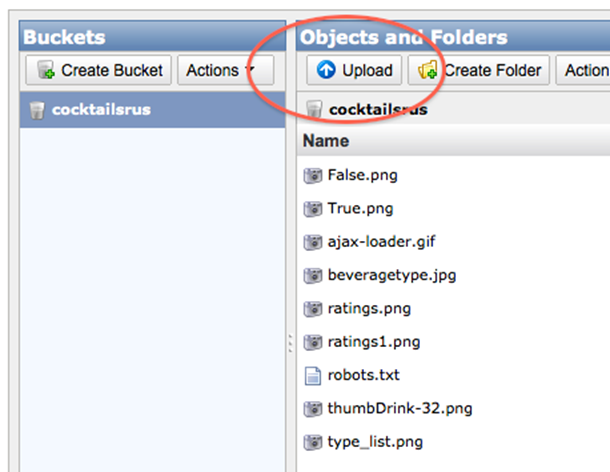
And once the bucket is created, you can use the AWS web interface to upload files.uploading files

So – you have an online storage bucket and you can add and remove files. Now for the next step – doing so programmatically.

The first thing you need is the AWS SDK. The easiest thing to do is install it via NuGet.

The AWS SDK NuGet

The SDK comes with samples, so it’s easy to get up and running. You need to add a reference to the SDK in your project, and then work with the AmazonS3 object, which is created for you by the Amazon.AWSClientFactory.

You can upload files from your hard drive or file streams. In my case, I resize images and create thumbnails from uploaded files so I use the stream approach. Here is my code creating the AmazonS3 object and passing it through to a method that does the actual writing (note the using block – the AmazonS3 object implements IDisposable):

code sample using AmazonS3

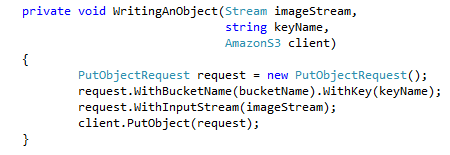
And here is the code doing the actual write to amazonS3. (The bucketName variable in the code sample is a private static string variable “cocktailsrus.” The keyName is your unique filename for the new image):

code sample PutObject:

(In order for the above code to work, you will also need to have set up two configuration keys – one for your AwsAccessKey, the other for AwsSecretKey).

So now I have a bucket and I have code to write my images to the cloud. I’m all set, right? Well, almost – because there’s the small issue of the bucket being private by default. I’ll deal with that issue and a few other niceties of setting up S3 to serve images in my next post.

Kevin Rattan

For related information, check out these courses from Learning Tree:
Cloud Computing with Amazon Web Services

Building Web Applications with ASP.NET MVC

Analyzing Queries with a SQL Profiler

I teach a number of courses that include technologies that wrap up data access–everything from Entity Framework to WCF Data Services to RIA Services. They all simplify the business of working with data–but at the cost of hiding the implementation from the developer. One question that continually crops up in class is: how do I know what’s going on underneath?

There are a number of possible answers. You might, for example, be able to use the Visual Studio debugger to see the SQL statement has been issued–but in some cases there is no easy way to see exactly how your programmatic query has been translated into SQL. And that can be a real problem. You might be issuing massive queries when you only intended to select a small amount of data. And if you can’t see the SQL, you have no real way to know what’s actually going on.

That’s where a SQL Profiler comes in.

In a recent blog post, I talked about IQueryable and the Web API, and a reader posted a comment regarding the dangers of using oData for filtering–specifically, that all of the data would be pulled back into memory before being paged at the oData layer. This is just the kind of situation where a SQL Profiler helps you get to the bottom of what is actually happening: is the oData filter being incorporated into the query, or run against the return from the query? Let’s take a look and find out.

First, we need a SQL Profiler–and there’s a free one available here. (If you like it, you might consider going to the DataWizard Web site and buying the full version).

The profiler gives us a number of options:

sql analyser options

You can check out performance:

performance screen

Get some insight into processes:

Application Dashboard

Or you can trace individual SQL statements, which is what will allow us to determine how our query is being translated into SQL.

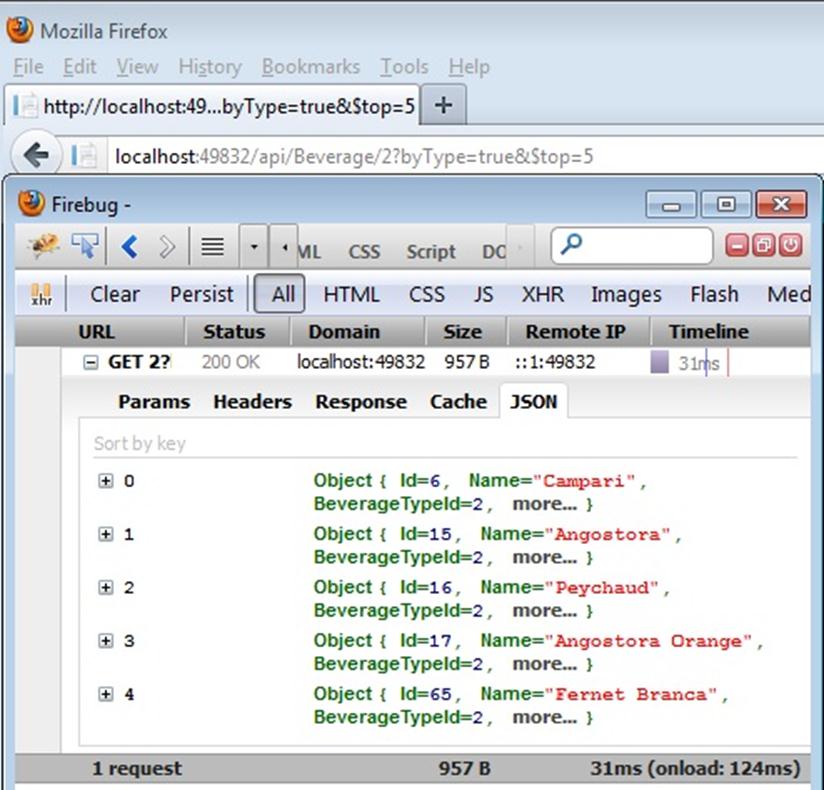
In this case, I’ve issued an oData query against the Web API and requested that only the top 5 elements are returned. In an ideal world, this would result in a SQL query for the TOP (5) matching rows.

As you can see, only five items were returned from the service. But where they filtered in the database or in memory after the whole data set was returned?

Web API Query

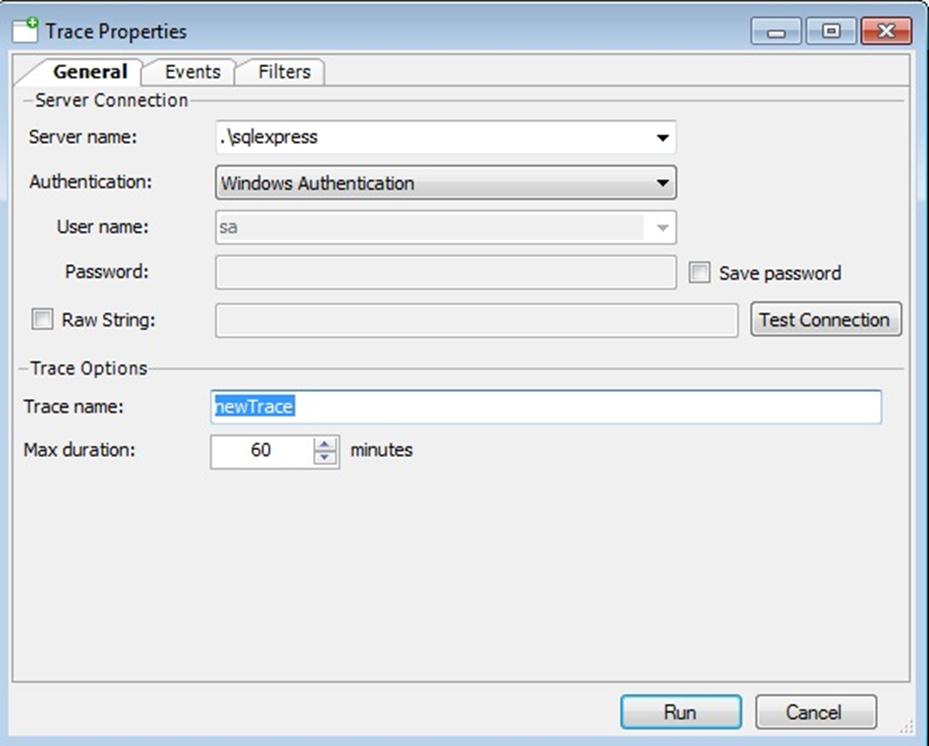
Let’s run a SQL trace and find out what’s really going on. I did so by clicking on “New SQL trace” and then accepting the defaults on the dialog:

Trace Dialog

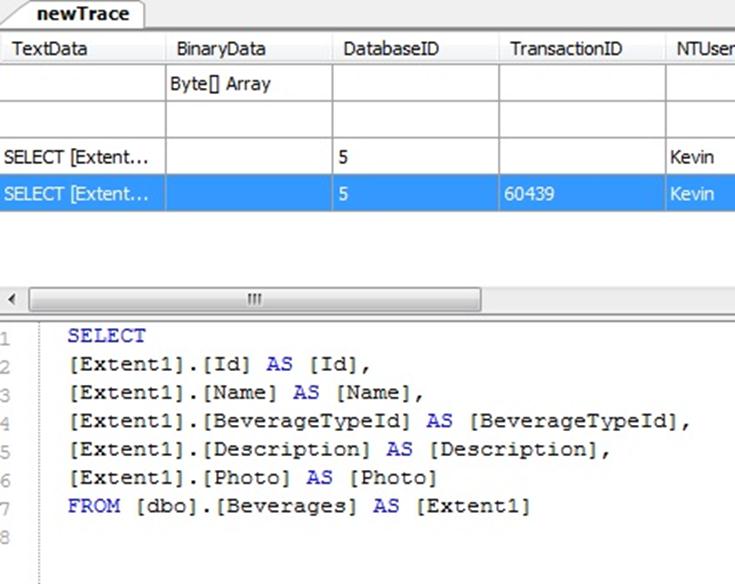
Then I ran the query. The result was unequivocal: there is no ‘TOP’, so the entire data set is being returned and then filtered in memory:

Trace

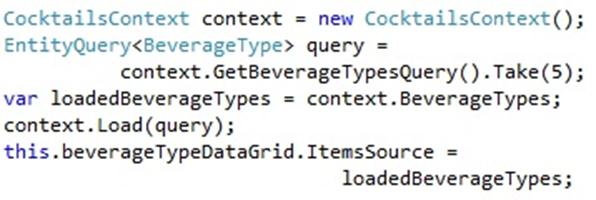
If oData queries to the Web API behave that way, what of other frameworks that expose IQueryable? I quickly put together a RIA service against the Cocktails database and created a client-side query requesting the first 5 matching elements:

Ria Query

This time, the SQL profiler shows that the query has incorporated the paging restriction:

SQL output

SQL profilers are indispensable for showing you what’s really going on in the database–good and bad.

Kevin Rattan

For related information, check out these courses from Learning Tree:

Building Web Applications with ASP.NET MVC

Building Web Applications with ASP.NET and Ajax

Programming WCF Web Services for .NET

Output Caching and Authenticated Users

In a recent post, I looked at using a custom parameter with OutputCache to provide different versions of an ASP.NET MVC view to different clients (mobile/traditional devices, AJAX / no-AJAX clients). The one question left unaddressed, however, was: what if there are some circumstances where you don’t want to cache at all?

Output caching means that your code runs once to provide the output, then doesn’t run again until the caching period has expired. In my example, that meant it would run four times for my different circumstances, but not again for each individual circumstance until the timeout had expired. But it turns out that isn’t sufficient to my needs. If the user is logged in, the code needs to run every time.

CocktailsRUs is a community site. Anyone can join, and when they join, they can mark cocktails as favorites for ease of access. Every time they view a cocktail, they can choose to add it to (or remove it from) their favorites, and thus be presented with the appropriate button to add or remove a favorite.

screengrab of remove favorite button

So how do we stop the site from using output caching with authenticated users?

One quick and (very) dirty approach would be to use the GetVaryByCustomString() method to assign a unique value (a timestamp or a GUID) as the cache key for authenticated users. That would ensure the code runs every time, but would also lead to a plethora of unwanted pages in the cache.

Fortunately, there is a much better solution. The Output Cache exposes a callback that allows you to decide whether to return the cached item, or run the code. We can use this callback to determine if the user is authenticated–and if they are, invalidate the cache for this response.

The first thing we need to do is create our own derived version of the Output Cache. That’s straightforward–just inherit from OutputCacheAttribute like so:

inheritance code sample

Then we need to override the OnActionExecuting() method to set up the callback where we will invalidate the cache:

OnActionExecuting code sample

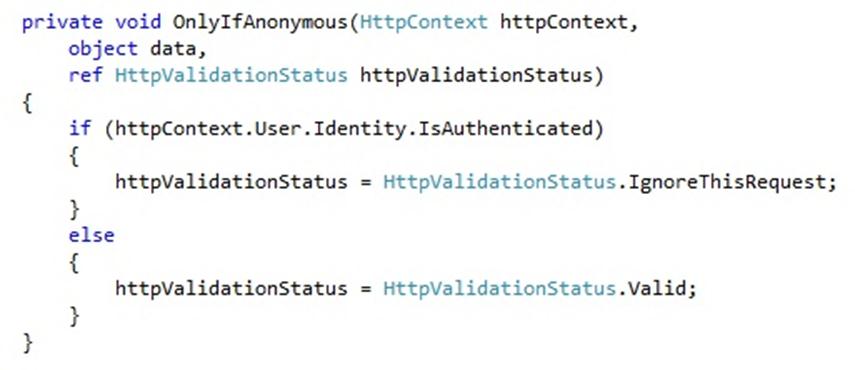
Now all we need to do is implement our OnlyIfAnonymous() method and tell it not to cache if this is an authenticated user. The signature of AddValidationCallback gives us access to the HttpContext, an optional data object (which we don’t need) and the HttpValidationStatus–which is passed in by reference and allows us to ignore the cache for this request. Here is the completed method:

Callback code sample

The one remaining step is to replace the OutputCache directive on our controller method with a reference to our new OnlyUnAuthenticated attribute.

Attribute code sample

Now we have a solution that caches appropriately for anonymous users, but ensures that the code runs every time for authenticated users.

Kevin Rattan

For related information, check out these courses from Learning Tree:

Building Web Applications with ASP.NET MVC

Building Web Applications with ASP.NET and AJAX


Learning Tree International

.NET & Visual Studio Courses

Learning Tree offers over 210 IT training and Management courses, including a full curriculum of .NET training courses.

Free White Papers

Questions on current IT or Management topics? Access our Complete Online Resource Library of over 65 White Papers, Articles and Podcasts

Enter your email address to subscribe to this blog and receive notifications of new posts by e-mail.

Join 29 other subscribers
Follow Learning Tree on Twitter

Archives

Do you need a customized .NET training solution delivered at your facility?

Last year Learning Tree held nearly 2,500 on-site training events worldwide. To find out more about hosting one at your location, click here for a free consultation.
Live, online training