Posts Tagged '.NET 4.5'

ASP.NET Web Forms and jQuery Mobile Reconsidered

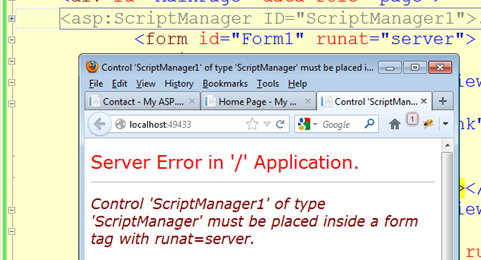
I’ve written before on this blog about the problems with combining Web Forms and jQuery Mobile. At bottom, it boils down to this: the Ajax navigation does not play well with ScriptManager. Beyond that, when working with jQuery Mobile you have multiple pages in the DOM at the same time, so you have to make sure you client-side IDs are unique across the site. And not only does every ASP.NET control already have a client ID, you also have to add IDs to the data-role page elements so that pageinit works properly.

I like the animated transitions – but not enough to make it worth that amount of effort. So I want to stop jQuery Mobile from converting my links and forms to use Ajax. Fortunately, that’s entirely doable.

jQuery Mobile exposes an ajaxEnabled property. If you set it to false inside the mobileinit event, your links will all behave as nature intended.

The one twist is that you need to do this between the script references for jQuery and jQuery Mobile. I placed the above code inside jquery.configuration.js, and then put them together thus:

When I click on the link to test2.html, the request does NOT use Ajax:

Test2.html does NOT have the configuration file:

And as a result, the request for test.html DOES use Ajax:

So – now we can use jQuery Mobile with ASP.NET Web Forms without worrying about all those pesky ID problems… And since that will eliminate most of the problems that arise from combining jQuery Mobile with the ScriptManager, wouldn’t it be nice if we could start using the ScriptManager with jQuery Mobile?

We could just add the configuration and jQuery Mobile scripts after the ScriptManager: but then other scripts might be injected in between, and that might lead to unexpected side effects down the line. So the best case scenario would be if we could inject our configuration file and jQuery Mobile into the ScriptManager itself. Fortunately, we can.

So how do we do that? Well, first we need to create a static class and a static method that calls ScriptManager.ScriptResourceMapping and adds a new definition:

Now the one final step is to tell ASP.NET about our new definitions. For this, we use the System.Web.PreApplicationStartMethod attribute, which runs at a very early stage in the application life cycle:

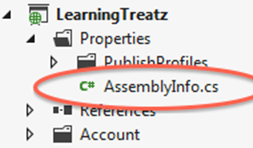
The best place to add this is inside AssemblyInfo under project properties

Now we can add both our configuration file and jQuery Mobile as ScriptReferences, using the names we specified when we added the definition:

And the end result is that the Web Forms application now uses jQuery Mobile AND ScriptManager seamlessly – with the minor sacrifice of forgoing the fancy animated transitions.

Kevin Rattan

For other related information, check out these courses from Learning Tree:

Building ASP.NET Web Applications: Hands-On

jQuery: A Comprehensive Hands-On Introduction

Internationalizing ASP.NET Web Forms

I was in Rockville last week, acting as the BORG (Back Of the Room Guy) for another instructor. About half the students were attending remotely, using Learning Tree’s AnyWare system – and one of them was joining us all the way from Sweden, which meant he had a different keyboard layout. Fortunately, that was easily fixed… but it got me thinking about the issue of internationalization.

I go backwards and forwards between the US and UK and as a result I’m very conscious of the differences  between British and American English. One of the big issues is keeping straight whether 1/6/2013 represents Jan 6 (US) to 1 June (UK). It’s all too easy to use the wrong one in the wrong country – but so long as I remember which country I’m in, I normally manage okay.

But what about the web? If a user enters 1/6/2013 – what date do they mean? If the web page shows the date 1/6/2013, what does the user think it means?

The answer, of course, is that we can’t know – the user could be anywhere any speak any language. So we need to internationalize our applications. Fortunately, ASP.NET makes this very easy to do.

Here is a standard contact email form. Currently, it’s English only:

And here is the underlying markup. It’s a FormView control using Model Binding:

At the moment, everything is hard-coded. We want all the text (Name, From etc.) to change depending upon the browser’s language settings. For this we need a resource file. Fortunately, Visual Studio will create it for us. Just make sure you have focus on the page in question and go to TOOLS | Generate Local Resource. (If you’re using VS 2012 and you can’t see the option, try switching between design and source views and clicking in the page: it can be a bit temperamental).

This generates a resource file with the naming convention [FormName].aspx.resx inside the App_LocalResources folder (which will be created if it does not already exist). Our page is Contact.aspx, so the file is Contact.aspx.resx:

This is the generated resource file, which as you can see has all of our original text.

This resource file is then mapped to our controls through markup. Note the meta:resourcekey attributes that have been generated by the designer.

So far so good – but we still haven’t added any internationalization. What we need to do now is to copy our resource file and give it a conventional name that includes the language and country codes. I’m going to create a French version of my form, so I need to call it Contact.aspx.fr-FR.resx or if I wanted to use one version for all French speakers regardless of location, Contact.aspx.fr.resx

And then I need to create all the French versions of the strings. I don’t speak French, so this is part googling, part guess-work: my apologies to any actual French speakers….

Now if the user arrives at the site with French settings, they automatically get the following:

As you can see, it’s not at all difficult to internationalize your web applications. You can also use global resources, and you can of course internationalize MVC apps as well, and you probably want to give the user the option to change the language… and I may just come back to those topics in another post.

Kevin Rattan

For other related information, check out this course from Learning Tree:

Building ASP.NET Web Applications: Hands-On

Dependency Injection with Ninject and MVC 4

This week I uploaded a new version of www.cocktailsrus.com. I didn’t change all that much… just upgraded the server to .NET 4.5, upgraded MVC4 from beta to release, Entity Framework to 5.0, jQuery to 1.8.3, jQuery UI to 1.9.2 and jQuery Mobile to 1.2.0. Oh, and I finally made the move to storing the images on Amazon S3 (and, of course, I wrote a program to upload all the existing images ready for the new version).

So, not much change at all, then 🙂

I’ve been itching to make this change for a long time, but now that I’ve done it I have a potential problem: the production and development versions are using different data store types for images. I want to make sure that if I’m in debug mode I call the local file storage version of my PhotoRepository, and if I’m in release mode (and hence on the live server) I am using Amazon S3. There are all sorts of primitive ways I could manage this. I could, for example, change the using directive when I switch versions, going from cocktails.storage to cocktails.storage.amz. But all such approaches are fiddly and prone to human error. What I really want is an automated solution that picks the right object automatically without my intervention.

It’s time for dependency injection!

There are a number of DI frameworks available for .NET, but I decided to go with Ninject (since it looked a. reasonably simple and, b. sufficient for my purposes). Here is my design goal:

The application should automatically select the correct PhotoRepository depending upon whether it is in debug or release mode.

This is what I did to achieve it:

  1. Use NuGet to install the base Ninject framework and the MVC extensions into the MVC project

Don’t worry that it says MVC3 – it works in MVC 4 as well.

This will add a NinjectWebCommon file to App_Start. You could use this, but I did all my work inside Global.asax instead, so I excluded NinjectWebCommon from the project.

  1. Inherit Global.asax from NinjectHttpApplication instead of just HttpApplication and implement protected override Ninject.IKernel CreateKernel() and the override of OnApplicationStarted (which you might have to add yourself).
  2. Move all the code setting up routes etc. from the Application_Start routine to OnApplicationStarted and then remove Application_Start
  3. We’re now ready to start programming. Move to CreateKernal() and create a standard kernel. Then load the executing assembly.

  1. At this point, all the plumbing is in place – we can start setting up our dependencies. What I really want to do is set a dependency on the business/service layer – but for that I first need to create the dependency from the controller to the Service layer. So let’s add a mapping between IBeverageService and the BeverageService implementation:

Except, of course, I don’t actually have an IBeverageService interface because I haven’t needed one before now.

  1. So before I do anything else I have to refactor and create the appropriate interface

.

  1. Not only does that work, I can get Visual Studio to do all the heavy lifting for me. So I go right on and create interfaces for all of my Service classes.
  2. Now that I have interfaces, Ninject will look for the constructor with the most arguments in the specified implementation and use it to create the objects. So now I need to add constructors to all of my service methods so that Ninject can pass in the concrete implementations at runtime. I can then assign them to private read only variables. Like this:

  1. So now I need to tell Ninject which PhotoRepository implementation to use, and since I want different ones between development and production, our old friend conditional compilation can be really helpful here:

  1. Great. We can now pass through the appropriate PhotoRepository implementation to BeverageService. But first we have to add an appropriate constructor to our controller so that BeverageService itself is injected appropriately:

  1. And that’s it. Now when the application runs, Ninject is injecting the types specified inside my Gobal.asax – and giving me the appropriate image storage implementation. Here is the complete code for the CreateKernel() method with all the Service implementations assigned to the appropriate interfaces.

What do I like about this? The fact that my service layer does not even have to have a reference to either storage .dll, and that my application automatically switches to the appropriate back-end depending on the context.

What do I dislike about this? The fact that my UI, which previously only knew about the Service layer and was completely ignorant of the rest of the system now needs to have references to all the objects I might potentially inject. Is it a price worth paying? Definitely.

Kevin Rattan

For other related information, check out this course from Learning Tree:

Building Web Applications with ASP.NET MVC

Efficient Paging with Model Binding in Web Forms

One of my favorite features in the latest release of ASP.NET Web Forms is Model Binding. I always liked it in ASP.NET MVC and it’s great to see it being ported over to Web Forms – and since the model is bound to control values rather than form values, we don’t have the same security concerns as with MVC. The remote user can’t just add new form fields and update more than you intended. (You can fix that in MVC with a white list, but the nice thing about Web Forms is we don’t have to worry about it).

Model binding isn’t just for updates, of course, and recently I found myself using it with a GridView and ListView for display purposes. In the process, I noticed a dearth of online examples showing how to do efficient paging when you’re using Model Binding and methods in the code-behind that call the business layer. So I thought I’d fill the gap.

First off, we need a data access layer to support paging. I like to keep my data access layer as simple as possible and have my logic in a business layer – so the adapter class will simply return IQueryable.:

IQueryable in the data access layer

The adapter is only visible inside my application and I’m never returning the IQueryable beyond the business layer. The business layer contains the logic for pagination (as well as any other necessary logic) and exposes multiple IEnumerable methods, all of which are supported by the underlying IQueryable. Here is a simplified version with the business logic stripped out:

business layer code returning paged data and count

There are two things to note:

  1. There is a method to return the total number of matching items
  2. The IEnumerable expects both the current row and the page size and uses Skip and Take to ensure we only ask for a subset of the data. The Query will be merged with the underlying IQueryable to return just the data we want.

We now have a back-end that is capable of supporting efficient pagination. How do we integrate this with UI controls using Model Binding?

I’ve created a ListView and added a DataPager:

ListView in Source View

When I add a new GetData() method, it creates a stub in the code-behind with an IQueryable return – but also comments advising you how to change it to IEnumerable and which arguments you need to add to support paging.

Here’s the original stub:

IQueryable stub

And here’s the revised IEnumerable version that calls my business layer object:

method in the code behind that calls business layer

And when we run it, we get nice paging using Model Binding via a simple pass-through method in the code-behind that calls our efficient data access code.

screen shot of paginated content

And you can use exactly the same techniques (and, in fact, the same method – the arguments are identical) for paging through a GridView.

Kevin Rattan

For other related information, check out this course from Learning Tree:

Building ASP.NET Web Applications: Hands-On

Combining jQuery Mobile with ASP.NET Web Forms

I’ve written quite a few articles on this blog about combining ASP.NET MVC and jQuery Mobile, but recently I had occasion to combine JQM with ASP.NET Web Forms. Not surprisingly, there turn out to be at least as many compatibility issues with Web Forms as there are with MVC – and since they’re different from the MVC problems I’ve already blogged about, I thought I might as well share them with you here.

The first problem isn’t really a Web Forms issue – it’s all about the fact that the default template created by Visual Studio includes a ScriptManager.

Now, the ScriptManager is a useful control. It’s not just about Ajax. It can be used to ensure that you have scripts when you need them and don’t end up with duplicate copies of the same script resources – ensuring, for example, that jQuery is only added to the page once, no matter how many  validators you add.

However, the ScriptManager has one big drawback from the point of view of JQM: you have to put it inside the HTML form. Here’s what happens if you don’t:

screen grab of error

So the ScriptManager goes inside the form, and the form, of course, needs to be inside the data-role=”page” element. Otherwise, the action attribute wouldn’t be set correctly when you navigate to a new page.  So the obvious thing to do is leave it alone and add the appropriate <div> elements and  data-roles for jQuery Mobile.  And at first it looks like it’s going to work:

jQuery Mobile screen grab

Unfortunately, appearances are deceptive. The ScriptManager acts as a placeholder for the scripts it adds to the page – so the scripts are being added inside the data-role=”page” element. And JQM replaces the content of the page element using Ajax – over and over again. The result is that pretty soon you are disappearing into recursive hell.

The following requests all followed  a single click on the home link:

Many calls to the home page

So – the ScriptManager has to go altogether. That’s fine. We can put the necessary script references in the head and everything works.

Unless we add validators to the page.

The problem is that in the absence of the ScriptManager to prevent duplication, the validators add jQuery to the page irrespective of whether it’s already there – and that reappearance of jQuery AFTER jQuery Mobile breaks JQM. So the next step to running JQM successfully with Web Forms is turning off client side validation.  Or maybe it’s time to give up on the traditional validators and use a version of my data annotation validator from an earlier post….

Kevin Rattan

For other related information, check out these courses from Learning Tree:

jQuery: A Comprehensive Hands-On Introduction

Building ASP.NET Web Applications: Hands-On

Web Forms Data Annotation Validation – Part 3

This is the third part in my look at Data Annotation validation in Web Forms in the Visual Studio 2012 Release Candidate. In the first part, I showed the server-side support for Data Annotation validation and model binding. In the second, I proposed one approach to providing client-side validation using jQuery plugins and a custom validator control that injects validation rules into the input element’s class attribute. The problem with that approach was an external dependency on the metadata plugin and the need to inject JavaScript into the page. So I got to thinking about how I might piggy-back on the unobtrusive validation support to produce a custom validator that worked in exactly the same way as the existing validators, but where the rules and messages were all derived from Data Annotations.

So the first thing to do was see how the existing validators work. I added various validators to a sample form and took a look at the underlying HTML. This is what I found:

client side unobtrusive attributes

There’s lots of interesting stuff here. The Text becomes the content of the span; the ErrorMessage is in data-val-errormessage; the validation method is in data-val-evaluation function; etc. If I can get my validator to read the Data Annotations and output the appropriate spans, that should give me the client-side validation I want.

I began in the same way as last time, by creating a new ASP.NET Web Control library and inheriting from the base validator. That code is in the previous posting, so I’m not going to repeat it here. (If you want to see the full code, I’ll put a link at the bottom of this post).

The reflection code is also the same, but one thing that is different is that this time I need to render HTML directly from the control, so I have to override the render method:

render method

The first thing I need is template for my span(s). I am going to put in {0} placeholders for the bits that need to change, and reuse the same basic string every time. Here is my template:

private static string template = “<span id=\”{0}\” data-val-evaluationfunction=\”{1}\” data-val=\”true\” data-val-errormessage=\”{2}\” data-val-controltovalidate=\”{3}\” {4} {5}>{6}</span>”;

Now, as I loop through the Data Annotations I can use string.Format() to fill in the blanks (note the += on the local spanString variable: that means I can add more spans if there are multiple annotations).

building the string

The arguments to the method are as follows:

  • this.ClientID is my current validator’s Id.
  • vat.ErrorMessage is the ErrorMessage from the Data Annotation.
  • c.ClientID is the control I am validating.
  • The string literals set up the validation for a required field
  • So where do display and message come from?

Display maps to the typical Validator display choices – static, dynamic and none. It’s initialized as style=”display: none;” data-val-display=”None” and overridden as appropriate. The message is the ErrorMessage to display in the control – as potentially overridden by the Text attribute.

message and display variables

So let’s add a reference inside our test web project and then add the new DataAnnotationValidator to the toolbox. Then we need to add a Required attribute to the Email class. (I added “DA” at the end of the message to confirm where the message was coming from).

required attribute

Then we need to set up the properties on our DataAnnotationValidator:

DataAnnotationValidator in aspx source

Now we can test it… and see that it works! We are now running client-side validation from Data Annotations, and it works and displays in exactly the same way as the other validators. And we have no additional dependencies and JavaScript injected into the page. Hurray.

working validation

Of course, we want to be able to validate other attributes as well. I went ahead and implemented several of them using the underlying RegularExpressionValidator. First I created a method to build all the regular expression spans:

regular expression builder

Then I called it from the various case statements for validation attributes:

switching attributes

Not forgetting the easiest one of all: the RegularExpressionAttribute itself:

RegularExpressionAttribute

Now I could play around with different values and messages in my Model….

Data Annotations

….and see my working Web Forms client-side Data Attribute validation:

validation working

I’ll probably refactor for robustness at some point, as well as adding support for additional attributes, but if you’re interested in the code for this version of the DataAnnotation validator, it’s online here: DataAnnotation2.txt.

Kevin Rattan

For other related information, check out these courses from Learning Tree:

Building Web Applications with ASP.NET and Ajax

Web Forms Data Annotation Validation – Part 2

In my last post I reviewed the new Web Forms support for server-side validation using Data Annotations, and ended with my frustration at not being able to find out how (or if) Microsoft had implemented the matching client-side validation. I promised to look at two different implementations that would provide client-side validation. This post is an overview of my first pass at a solution–using the jQuery validation plugin.

My hope was that since Microsoft had implemented client-side validation in MVC, all I would have to do was rip the code out of an MVC template and tweak it a bit to make it work in Web Forms. Sadly, it wasn’t going to be as easy as that. I brought over the appropriate JavaScript files, tried adding the web.config settings, but nothing happened. Still, at least I had the MVC JavaScript files and that meant I had the jquery.validate plugin – and since I’ve used that to get around issues in MVC validation, I could do so again for Web Forms. All I had to do was read the Data Annotations in a custom validator and inject the appropriate rules into the control to be validated. So… here goes:

The first thing I did was create a new ASP.NET server control so that the validator would be just another control in my toolbox:

New project dialog

Then I added a new class and inherited from the base validator:

inheriting base validator

That meant implementing the single method EvaluateIsValid():

overriding EvaluateIsValid

I simply return true here because the validator isn’t actually going to do any validation–it’s just going to inject the rules into the form element so that the validate plugin can do that for me. The validate plugin is able to read validation rules out of HTML class attributes. I’m going to translate DataAnnotations into the object literal arguments the plugin expects, so that when the validator reads the following Data Annotation…

Data Annotations

….it generates “{required:true, messages:{‘The from address is required’}}“inside the class attribute:

generated html

(In order for this to work, I’ll have to add the metadata plugin to my master page, as well as the validate and validate.unobtrusive plugins that I “borrowed” from the MVC template).

I’m not going to render this control itself, just inject content into the control it’s validating, so I override the PreRender event. I do the work inside the event handler (and inside a check to see if IsPostBack is false so that I’m only inject my code once). I even commented out the call to base.OnPreRender. Why bother? I’m not going to render it.

onprerender

The first task is to read the Data Annotations, so I need a reference to System.ComponentModel.DataAnnotations. Now I can use reflection to read the annotations, thus:

reflection

As you can see, I’m using TypeName, TypeAssembly and TypeProperty properties on my class to provide all the information I need to get hold of the object and its Data Annotations. These need to be provided by the UI developer, thus:

DataAnnotationValidator in aspx source

Now it’s just a question of checking the type of the validation attribute and creating the appropriate string. I did this by building two collections–one of rules, the other of messages. Here are the collections and a method used to populate them:

properties

And here is a switch inside the loop through the attributes that calls the AddValidation() method:

switching attributes

Once I have set up the rules and messages, all I need to do is create the literal and inject it into the control.

building the string

Then it’s time to test it… and nothing happens. That’s because although the validate plugin is there, there’s no call to .validate() on the page. So now I need to add in a scriptlet to make the plugin runs:

scriptlet

And then I need to register that script on the page.

registering script

Phew! Finally we’re done. All I have to do is add a reference to the library, add the DataAnnotationValidator to the toolbox (right-click and choose items, then browse to the library) and then add the appropriate validators to the page and give them the right property settings:

property settings

The DataAnnotation validator translates the rules into a form understood by the validate plugin, the validation runs and we have client-side validation:

working validation

Obviously, there are a lot of things that can be improved in this version. It doesn’t cover all the possible Data Annotations. It doesn’t allow for missing error messages. It only validates TextBox controls. I could improve it, but I’m not going to: I decided I didn’t like the dependency on the metadata plugin, and I hated having to inject JavaScript into the page. So I decided to go back to square one, forget about bringing in any scripts from the MVC version and work with the unobtrusive validators that come with the Web Forms template instead. And that’s what I’m going to cover in my next post.

(If you’re interested in the full code for this version of the DataAnnotation validator, it’s online here: DataAnnotation.txt.)

Kevin Rattan

For related information, check out these courses from Learning Tree:

Building Web Applications with ASP.NET and Ajax

jQuery: A Comprehensive Hands-On Introduction

Web Forms Data Annotation Validation – Part 1

This will be the first of three posts on Data Annotation validation in Web Forms in Visual Studio 2012. In the first one, I’ll talk about what I like (and what I don’t) in the new release, and in the following two I’ll show two alternative solutions to dealing with the frustration I’ve started to feel over what is either a missing feature or very-hard-to-find documentation.

First off: I love Data Annotation validation. I’ve mentioned it in a number of posts and I really like being able to annotate my classes so that the validation rules travel around with the class. I always hoped and expected that Microsoft would provide Data Annotation validation in the new release of Web Forms, given that it’s already in WPF, Silverlight and MVC. I was also hoping that Microsoft would give us unobtrusive client-side validation.

The Good News: they have.

The Bad News: they don’t seem to have done both together.

(Or at least, if they have, I can’t find any documentation on it. There are LOTS of articles out there talking about the new Data Annotation validation and also about the new unobtrusive client-side validation–but when they refer to Data Annotation validation, they are talking about server side validation, and when they talk about unobtrusive validation they’re talking about the existing property-based validators. I’ll be delighted (and grateful) if anyone out there can point me at any documentation that shows Microsoft has implemented client side Data Annotation validation in Web Forms as they did in MVC–in which case my own experiments in that direction, to be detailed over the next two posts, will have been merely a fun coding excursion and not actually necessary).

So, back to the good news.

I was playing with the new model binding functionality in Web Forms, and it’s really nice. I created an Email model which had the necessary data, a static method to return an empty Email object for the model binder and the code to send the email, thus:

Email Model class

Then I bound a Form View to my model and got rid of everything except the Insert View, thus:

FormView bound to Email model

This allows me to put the following method in the code behind and pass all the work to the business object:

code behind method

That works beautifully, and with MVC-like levels of Separation of Concerns goodness. Now if I just add some Data Annotations…

Data Annotations

I should have validation, too. And I do. But sadly, only on the server side. The page does a full round trip before showing the error messages.

server side validation

So I looked all over to see how I could turn on client side validation… and just couldn’t find it. In the end, I decided it was going to take me less time to write my own version than to find Microsoft’s implementation (if any). So I did so… twice. And in the next couple of posts I’ll look at two different ways of providing client-side Web Form validation using Data Annotations.

Kevin Rattan

For related course information, check out Learning Tree’s course, Building Web Applications with ASP.NET and Ajax.

Streamlined Web Loading in the Visual Studio 11 Beta

One of the features of Visual Studio 11 that I’m really looking forward to taking advantage of is CSS and JavaScript minification and bundling.

As developers, we like to be able to break our applications into reusable components. That makes development and maintenance much more manageable. Sometimes, however, it can have an impact on performance. The more CSS style sheets and JavaScript files you add to a page, the longer that page will take to download – and it’s not just a matter of the size of the files; the number itself is a problem. Http requests are expensive; the more you have, the slower your page is to load, even if the absolute size of the downloaded files is not very large.

Visual Studio 11 comes with two new features that make it more practical to break our JavaScript and CSS into multiple file. Bundling and minification give us a means of ‘componentizing’ our Web applications, without taking the performance hit of too many http requests. Bundling allows you to combine multiple files into a single larger file. Minification removes unnecessary white spaces to ensure that the new file is as small as possible. Taken together, the two techniques have a major impact on performance.

There are two versions of the functionality: the simple, automatic way; and the much more useful custom approach. In the simple version, the contents of folders are automatically bundled and minified if your <link> and <script> tags to point at the default directories and don’t specify individual files, thus:

<link href=”/Content/css” rel=”stylesheet” type=”text/css” />

That gets converted into html along these lines at runtime:

<link rel=”stylesheet” type=”text/css” href=“/Content/themes/base/css?v= UM624qf1uFt8dYtiIV9PCmYhsyeewBIwY4Ob0i8OdW81” />

That’s fine as far as it goes, but is also rather limiting. You have to use default locations, and there’s no scope for having different bundles for different versions of your application. In my www.cocktailsrus.com site, I have two distinct versions, for mobile and standard browsers, each of which requires different .css and .js files, so I need to be able to create custom bundles.

The MVC4 template comes with a feature that’s designed to support this – ResolveBundleUrl():

<link href=”@System.Web.Optimization.BundleTable.Bundles.ResolveBundleUrl (“~/Content/css”) rel=”stylesheet” type=”text/css” />

Now we can define our own custom bundles. In my case, I can create two new sub-folders under the style and script paths, one for mobiles and one for the standard Web site:

Then I change the paths passed to ResolveBundleUrl() to point at my new folders….

<link href=”@System.Web.Optimization.BundleTable.Bundles.ResolveBundleUrl(“~/Content/site/css”) rel=”stylesheet” type=”text/css” />

<script src=”@System.Web.Optimization.BundleTable.Bundles.ResolveBundleUrl(“~/Scripts/site/js”)“></script>

and… it doesn’t work.

Although ResolveBundleUrl() supports adding non-default paths, you have to do a little more work and register your new paths in the application start event in the Global.asax before it can use those paths.

code in the global asax adding bundles

This tells the system that we’re adding two bundles – one for .css files and one for .js, and that all the files in the specified directories should be part of the bundle. (You can also specify individual files if you need to control the loading order beyond the default settings, which first prioritize known libraries like jQuery, then load the files alphabetically).

One nice additional feature is that the bundles are cached on the browser using the generated path (e.g. css?v=UM624qf1uFt8dYtiIV9PCmYhsyeewBIwY4Ob0i8OdW81). This means that not only are they loaded faster the first time the user visits the site, they do not need to be downloaded again the next time. More significantly, if any of the files in the bundled folder changes, so does the generated path. That means your users will never be stuck with old versions of your style sheets or JavaScript files.

Kevin Rattan

For related information, check out these courses from Learning Tree:

Building Web Applications with ASP.NET and Ajax

Building Web Applications with ASP.NET MVC

Simplifying Web Development with Page Inspector

I’ve been playing around with the Visual Studio 11 beta for a little while now, and my favorite thing so far is Page Inspector. I like tools that make my life easier – and Page Inspector just saved me a lot of poking around inside the underbelly of an application.

I have been busy porting my cocktails application to MVC4, Entity Framework 4.5 and Visual Studio 11 ready for its release later this year. It has all gone rather smoothly so far, with the biggest problem being that it doesn’t seem to like the System.Transactions namespace. (So I’ve commented out the transactions for the time being and pressed on – I’ll come back to that when I’ve played with some of the new stuff). I managed to recreate my Entity Model using the latest version, created a new MVC4 project and selectively imported my Web site content–and pretty soon I had the site up and running in Visual Studio 11.

When you’re upgrading, the easiest problems to fix are the breaking errors. You run the project, it blows up – you see that you need to add a missing reference. The more difficult problems arise when something works, but not as you expect. And that’s where Page Inspector became enormously useful.

So what is Page Inspector?

Essentially, it’s a tool that takes the DOM inspection approach of client-side tools like Firebug and the IE Developer Toolbar and applies it server-side. You can click on an element on the page, and not only do you get to see the HTML and the CSS – you also get the server-side files that are responsible for that part of the page. Here is a screenshot, showing Page Inspector on the left.

screenshot of page inspector

In the image, I’ve clicked on the selection icon to put Page Inspector in selection mode. This is what the selection icon looks like:

the selection icon

Once I’ve done that, the panel on the right shows me the server context that provides that section of the page.

And how did Page Inspector help?

I noticed that the new MVC4 internet template offered some improvements to the login process (e.g., Ajax) so I wanted to use the new version rather than the current version. I changed the layout pages to point at the new partial page and then ran the app, only for this to happen when I clicked on the login link:

404 error

So I went back to the page with the link in Page Inspector, hit the selection tool and clicked on the login link – which showed me I was still using the old partial page after all.

page discovered via page inspector

So what had I missed? In the old days (i.e., yesterday) I would have had to:

  • Infer that I was still on the old partial page
  • Work out where that partial page was being referenced from
  • Trawl through the site to find the layout page and make the change

Now all I had to do was…

  • Click on the selection tool to activate it
  • Select the HTML element that contained the Log in link

… and there in the right hand panel was the layout page I’d forgotten to change:

layout page discovered via page inspector

What’s more – I could make the change there and then while Page Inspector was still open.

correcting while inspecting

Page Inspector then told me the source had changed and offered me the opportunity to refresh the page.

warning out of synch

The text then changed from “Log on” to “Log in” – so I could see at once that the correction had been successful.

corrected page

So far, I like Visual Studio 11 a lot. I’ll keep you posted on anything else I find out (both good and bad) as I work through the conversion.

Kevin Rattan

For related information, check out these courses from Learning Tree:

Building Web Applications with ASP.NET and Ajax

Building Web Applications with ASP.NET MVC


Learning Tree International

.NET & Visual Studio Courses

Learning Tree offers over 210 IT training and Management courses, including a full curriculum of .NET training courses.

Free White Papers

Questions on current IT or Management topics? Access our Complete Online Resource Library of over 65 White Papers, Articles and Podcasts

Enter your email address to subscribe to this blog and receive notifications of new posts by e-mail.

Join 29 other subscribers
Follow Learning Tree on Twitter

Archives

Do you need a customized .NET training solution delivered at your facility?

Last year Learning Tree held nearly 2,500 on-site training events worldwide. To find out more about hosting one at your location, click here for a free consultation.
Live, online training