Posts Tagged 'Dynamic Data'

Dynamic Data and Web Forms – Part Three

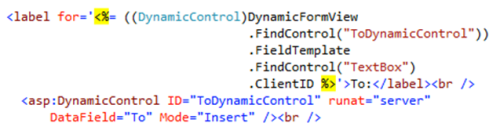
This is the third in a series of posts looking at how to integrate Dynamic Data features into an ASP.NET Web Forms website – and hence take advantage of automated client-side data annotation validation. In the last post, I showed how to connect a label to a dynamically generated TextBox using some complicated data binding code:

It works, but it’s hardly practical. Fortunately, Dynamic Data allows you to create custom templates – and that offers a much more practical solution connecting labels to our UI controls.

Dynamic Data uses conventional names and locations, so the first thing we need to do is add a new folder structure to our Web site – a DynamicData folder, with a nested FieldTemplates folder.

Next, right click on the FieldTemplates folder, select Add New Item and pick Dynamic Data Field:

Name it appropriately – in this case, I went with LabelMapper, and the wizard generated two .ascx controls for me, LabelMapper.ascx and LabelMapper_Edit.ascx:

The first version is read only, and contains a literal control (don’t worry about the red underlining – it compiles and runs despite Visual Studio not being entirely happy):

And here is the edit version:

It’s simplicity itself to connect this to our dynamic controls via the UIHint attribute. Assign the name of the .ascx control as the value of the UIHint attribute, and Dynamic Data will automatically look inside the FieldTemplates folder under the Dynamic Data folder for the matching files.

Notice that I’ve also removed not only my label, but also the default scaffolded text explaining that this is the “from” field. That’s because we’re about to customize the template so that it autogenerates the label.

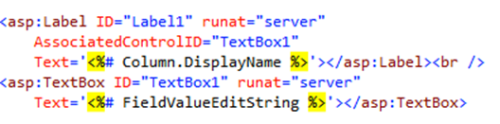
The first task is to drag a label into the template, and associate it with the TextBox:

Then we need to set the text. The obvious choice for this is the name of the property we’re binding to  (customizable as DisplayName via Data Annotations if the original property name  is unsuitable, e.g. combines two words into one). This information is available as Column.DisplayName inside the Dynamic Data Field:

Now when we run the page, we get labels properly associated with the controls:

But there’s still a problem. The Message field should be a TextArea, not a simple TextBox. We don’t want to have to create a whole separate template for that – and we don’t have to. Simply add a public TextBoxMode property to the template’s code behind, with a default value of SingleLine:

Then add a TextMode attribute to the TextBox and bind the value to the property:

And then set the value as an attribute of the Dynamic Control:

And now we have dynamically generated controls that respect data annotations and generate the controls we want via a couple of simple attribute settings:

And the best thing is – now that we’ve created the template, we can reuse it any time we use Dynamic Data controls with standard Data View controls, and get the benefits of dynamic control generation along with well formed, accessible HTML.

Kevin Rattan

For other related information, check out these courses from Learning Tree:

Building ASP.NET Web Applications: Hands-On

Dynamic Data and Web Forms – Part Two

In my last post, I showed how you can use Dynamic Data with the FormView and similar controls to autogenerate UI controls and associated validation based on data annotations. The one downside was that the scaffolded HTML is horrible – and fixing it is nowhere near as easy as you might hope.

This is some of the markup generated by the wizard in Visual Studio:

This is what the output looks like – notice the horrible ragged edge and the use of inaccessible LinkButtons:

And this is a snippet from generated HTML:

So – we have text where we should have a label, making our page both inaccessible and less functional than it should be, and we have a link button where should have a submit button. We can fix the button just by changing the type, and we can fix the ragged edge by adding in extra line breaks. But it turns out that the labels are much more of a problem than they might at first appear.

First, let’s try adding a label and pointing it at the dynamic control:

That looks like it ought to work… And at first sight, the generated Web page looks a lot better when we run it. The label is now on a separate line from the TextBox, and the styling shows that it is truly is a label control, and not just text:

Unfortunately, it’s not as good as it seems at first glance. A look at the HTML source shows that this label is not properly connected to its TextBox: the for and the id do not match.

The usual fix in these circumstances is to switch to static client side ids. So let’s try replacing our ASP.NET label with a simple HTML label, and setting the dynamic control to have a static ClientIDMode:

Here’s what we get when we run it:

Okay – so let’s try harder by setting the ClientIDMode of the FormView itself to Static and see if that will do the trick…

Unfortunately, that doesn’t help either – though, refreshingly, the problem is different:

Fundamentally, the problem is that the DynamicControl is a container. We need the label to be associated with the TextBox inside the DynamicControl.

First, let’s get rid of those Static ClientIDMode values, as we can’t have every TextBox with the id TextBox. Then let’s see if we can bind the value of the for attribute to the ClientID property of the control. We have to do a bit of digging to get there, as the TextBox is inside a FieldTemplate which is inside the DynamicControl, which is inside the FormView:

And this is the output HTML:

Finally, we have a winner. Except for the fact that Dynamic Data is supposed to simplify the generation of the UI, and there is nothing remotely simple about having to add labels with custom data binding code that includes nested FindControl() methods.

Fortunately, our quest for automated client side data annotation validation does not end there – because it’s possible to customize the templates for DynamicControls, and that offers a much more practical and satisfying solution to the problem of poor scaffolding. And that will be the subject of my next blog post.

Kevin Rattan

For other related information, check out these courses from Learning Tree:

Building ASP.NET Web Applications: Hands-On

Dynamic Data and Web Forms – Part One

I’ve blogged here a few times about data annotations and validation in ASP.NET, and most recently with some sample code for a Web Forms validator that converts data annotations into client-side validation. However, while there is no data -annotation-aware standard validator, there is one way you can get your controls to validate against data annotations – and that’s by using Dynamic Data.

Dynamic Data has been around for a while. It has its own project type, and can be used to scaffold an entire web site based on an entity model. It can be extensively customized but it’s not really suitable for public facing web sites (though it’s great for quick admin-only management).

But that’s not all there is to Dynamic Data. It is also available inside other projects. There are a set of controls in Web Forms that are specifically designed to integrate with Dynamic Data AND with existing Web Form controls such as the GridView and FormView. It’s these controls that give us out-of-the-box data annotation support.

So how does it work? Let’s consider a form to send an email. There are a number of ways to go about this. We could create a form from scratch using standard controls, adding our own validation:

Or we could create an email class complete with data annotations….

…and use it to get a FormView to scaffold  the form for us.  But despite all those nice data annotations, that doesn’t add validation, so again we would have to add it ourselves, so it’s not really saved us much work:

Alternatively, we could get a FormView to scaffold it for us using Dynamic Data – and this is where we start benefiting from those data annotations.

At first glance this doesn’t look any better, as there are no validation controls in sight – but only because they’re hidden away inside those dynamic controls – as are the TextBoxes that map to the object’s properties. There’s just one problem – this is what we get if we run the page…

It turns out that Dynamic Data is not enabled by default. You have to enable it on the container control, and tell it what type it’s dealing with – and you have to do so inside the Page_Init event.

So now when we run the page with the FormView set to insert mode, we automatically get TextBoxes for the Email…

And this time the data annotations give us client side validation (though I had to add the validation summary to show the message from the From property):

The only remaining problem is that the scaffolded HTML is horrible. There are no labels, just text – so the page is inaccessible. The clever link buttons rely on JavaScript, another accessibility no-no. The button is easily fixable, but adding Labels to the TextBoxes turns out to be surprisingly fiddly – and managing that (and how to customize dynamic controls generally) will be the subject of my next blog post.

Kevin Rattan

For other related information, check out these courses from Learning Tree:

Building ASP.NET Web Applications: Hands-On


Learning Tree International

.NET & Visual Studio Courses

Learning Tree offers over 210 IT training and Management courses, including a full curriculum of .NET training courses.

Free White Papers

Questions on current IT or Management topics? Access our Complete Online Resource Library of over 65 White Papers, Articles and Podcasts

Enter your email address to subscribe to this blog and receive notifications of new posts by e-mail.

Join 29 other subscribers
Follow Learning Tree on Twitter

Archives

Do you need a customized .NET training solution delivered at your facility?

Last year Learning Tree held nearly 2,500 on-site training events worldwide. To find out more about hosting one at your location, click here for a free consultation.
Live, online training