Creating and Publishing NuGet Packages

NuGet is one of those tools that gets more and more important all the time. A while back, it was useful for adding small, specialized packages for particular projects. Nowadays, it’s fundamental – and going to be even more so when vNext is live. We all use it to add packages, but how difficult is it to create and publish our own packages? As it turns out, not very difficult at all.

I’d been meaning to turn my data annotation validator into a NuGet package for some time – and today, I finally did something about it. This is how you do it:

1. Get nuget.exe

Go to nuget.org or nuget.codeplex.com and download nuget.exe. Once you’ve got it, save it somewhere nice and easy because you’re going to need to….

2. Add it to the path

Right click on ‘computer’ in windows explorer, select ‘properties’ and then ‘advanced system settings’. Then click on ‘Environment Variables’ in the dialog.

In the Environment Variables dialog, find the Path variable and click Edit.

In the next dialog, add a semi-colon at the end and then put in the full path to nuget.exe (in my case that was c:\Nuget):


3. Create a Nuspec file.

This is a little XML config/specification file used in packaging, and you generate it from the command line. Open a command window, navigate to the folder where you have your Visual Studio project file and type in:

Nuget spec

This, of course, is why you wanted nuget in the path. Nuget.exe will now generate the XML file using your assembly settings, and placing default text where it doesn’t have info. Here’s a raw one:

And here’s one that’s been edited:

4. Pack it ready for publishing

This is again done using the command line, adding an argument to tell it to package the release version, not the default (which is probably debug). I’ve put brackets around the part that you would need to replace with your own package:

nuget pack [DataAnnotationValidator.csproj] -Prop Configuration=Release

The result is another file, this time with the extension nupkg.

5. Publish it to Nuget

That means first you have to go there and sign up – which is all very straight-forward. Once you’re signed up and you’ve clicked on the link in the confirmation email, you will have an API key on your profile page, and that allows you to publish your package. Get your key and then run the following in your command window:

nuget setApiKey [key from profile page]

That means you won’t have to put in your key every time. Now go to the Upload Package page and browse for your nupkg file:


It asks you to verify the details….


And then that’s it – your package is online and available for download.


I installed the package to test it, and the config file was updated….


the reference was added…..


and the dll was in the bin directory:


And that allowed me to add the control to the toolbox and use it as part of my project:


Obviously, there’s a lot more you can do with NuGet – like adding support for multiple frameworks – and I may well look at some of the options in a future post.

Kevin Rattan

For other related information, check out these courses from Learning Tree:

Building ASP.NET Web Applications: Hands-On

Building Web Applications with ASP.NET MVC

Understanding Team Foundation Server (TFS) Pricing

I used to think Team Foundation Server was expensive. As it turns out, it is very affordable and sometimes free. There are three different versions of TFS: Team Foundation Server, Team Foundation Server Express Edition and Visual Studio Online.

TFS Express Pricing

TFS Express is a free, and can be downloaded here and installed on any computer with Windows 7 or higher. There are some limitations to TFS Express which include the following:

  • It is limited to 5 users.
  • Project data can only be stored in SQL Server Express Edition, (this means any single project would be limited to 10 GBs).
  • Can only be installed on one server, (full versions of TFS can be split across multiple servers for performance and redundancy).
  • Some advanced analytics are not supported.

As you can see from the limitations, TFS Express won’t work for large teams and large projects. However, it would be fine for smaller teams and departmental projects.

Visual Studio Online Pricing

Visual Studio Online is Microsoft’s cloud-based version of Team Foundation Server. See the article “What is Visual Studio Online?” for more information. Visual Studio Online has two options, a basic option and an advanced option which includes some advanced features. The basic option is free for the first 5 users, then $20 per month for additional users. The advanced option is $60 per month for all users.

However, there is no charge for developers who already have Microsoft Developer Network (MSDN) subscriptions. Essentially, if you have an MSDN subscription you already are paying for Visual Studio Online (or TFS) whether you use it or not. A lot of companies are paying for MSDN, but aren’t using TFS because they think it is expensive, not knowing that they are already paying for it.

Team Foundation Server Pricing

If you want a local install of the full version of TFS you need a server license and each developer needs a client license. The server license can be purchased for about $500 and the client licenses are about the same.

However, just like with Visual Studio Online, TFS is included with MSDN subscriptions. So, if you already use Microsoft tools you may already be paying for it.

Conclusion

Getting started with TFS is easy and affordable. If you’re working with a team of 5 or fewer people, you can use TFS or Visual Studio Online for free. If you are an MSDN subscriber you are already paying for TFS.

Team Foundation Server Training

Team Foundation Server makes it easy to manage and track work on any type of project, and this is just a small sampling of the capabilities of TFS. Visual Studio Online makes getting started with TFS easy, and for small teams it is free. To learn more about TFS you may be interested in Learning Tree course 1816, Agile Software Development with Team Foundation Server.


Doug Rehnstrom


Managing Projects with Team Foundation Server (TFS)

Recently at Learning Tree, we wrote a training course on Team Foundation Server (course 1816, Agile Software Development with Team Foundation Server). It seemed natural to use TFS to manage the course writing process.

Creating the Team Project

We used the online version of TFS, called Visual Studio Online to manage this project. Visual Studio Online was perfect for two reasons. First, it is free for up to five users (and a course development team is that small). Second, all the members of the team work in different locations, thus everything needs to be accessed online. (See the post “What is Visual Studio Online?” for more information.)

We created a team consisting of the three people (the author, technical editor and product manager). Every task must be assigned to a team member. We also added a team member named “1816 Team”. This is for tasks that need to be done by the team collectively, not done by an individual.

Defining Team Members

Dividing the Project into Iterations

At Learning Tree we have a number of milestones when developing a course. We have a course planning meeting. A few weeks later there is an alpha meeting. Then, there is the beta of the course, and lastly there is the first run of the course. Before the end of each of these milestones there is a long list of tasks that need to be accomplished.

These milestones provided natural iterations for the project. These iterations and their start and end dates were entered when defining the project.

Defining Iterations


Adding Work to the Backlog

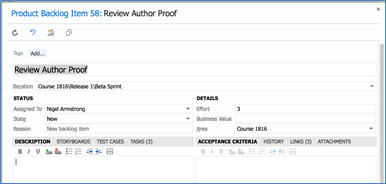
The next step was to add everything that needs to be done to the backlog. Each item is assigned to a team member (or the team collectively) and an estimate of effort is assigned to each item as well. An example backlog item is shown below.

Adding Backlog Items


To accomplish a backlog item, a number of specific tasks need to be done. So, each backlog item is divided into tasks. Like backlog items, tasks are assigned to team members and their effort is estimated. An example is shown below.

Dividing Items into Tasks

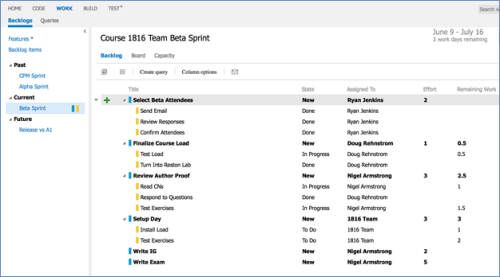
Each backlog item is assigned to an iteration. This is just a matter of dragging and dropping each item into the appropriate iteration using the online tool. The final results look as shown below.

Product Backlog


This might seem like a lot of work, but in the grand scheme of things it’s not a big deal. All tolled maybe we spent a couple hours on this. It’s also something that can evolve; at any time items can be added, removed or changed.


Tracking Project Progress

The obvious question is, “why would I want to do all this?” First, it makes it easy for team members to know what they need to do. Second, it helps the manager know whether the team is on schedule or not.

In addition to the backlog, there is a Kanban board view of the project. The Kanban board graphically depicts what each team member is working on, what they have finished and what they have left to do. Each team member just needs to drag items into the appropriate column and update the work remaining for each item as they do their work. The Kanban board can be organized either by team member or by backlog item. See the screenshots below.


Kanban Board Organized by Team Member

Kanban Board Organized by Backlog Item


Team Foundation Server Training

Team Foundation Server makes it easy to manage and track work on any type of project, and this is just a small sampling of the capabilities of TFS. Visual Studio Online makes getting started with TFS easy, and for small teams it is free. To learn more about TFS you may be interested in Learning Tree course 1816, Agile Software Development with Team Foundation Server.


Doug Rehnstrom


Setting Up a Continuous Integration Server with Team Foundation Server (TFS)

What is Continuous Integration?

The goal of continuous integration is to allow developers to check in their code, compile it, run the tests, and deploy the application all in a single step. To accomplish this goal a number of things must be setup.

First, a version control system. Programmers check their work into the source control. Changes from each developer are merged to ensure there is a single master version of the program.

Second, the team needs automated testing. This is done using a unit testing framework. There are many such frameworks for every modern development language.

Third, there must be a test environment that the application will be deployed onto. Much of today’s software is written using Web technologies. Thus, the team will need a Web server they can deploy to for testing their application.

Fourth, a build server must be set up. The build server detects when code is checked in, compiles it, and then runs the tests. If all the tests succeed, the build server will deploy the application.

Sounds like a lot of hard work? Microsoft Team Foundation server makes it easy.

Team Foundation Server Version Control

TFS has two versions control systems. One is called Team Foundation Version Control and is a Microsoft product. The other is Git, an open source version control system. When a project is created with TFS one of these version control systems is selected. Both integrate with Visual Studio, and programmers can easily check in their code changes whenever they choose to.

Automating Builds with Team Foundation Server

Team Foundation Server includes a build service. To tell the build service what to do, you create a build definition. This is done from Visual Studio Team Explorer. Click on the Builds button and the select New Build Definition.

Team Explorer

When defining a build you need to specify a trigger that determines when the build runs. Select Continuous Integration and the build will run every time a programmer checks in his code.

Build Configuration

Visual Studio will automatically detect your unit tests and include them when running the build. That’s easy. The trick is to automate the deployment of the application. The easiest way I’ve found to do this is by specifying a Publishing Profile when defining up the build. This is done on the Process tab of the Build Configuration dialog. See the screen shot below. Notice, the command tells the build service to deploy when it runs and use a publishing profile called “LocalDeploy” to determine where to deploy the application.

Automating Deployment


Defining a Publishing Profile

Publishing profiles are created as a part of a Web project in Visual Studio. They specify where the Web application will be deployed. In the screenshot below, the publishing profile specifies that the application should be deployed to a virtual directory on the local machine. This could be any machine though, and any number of publishing profiles can be created in a Web project.

Publishing Profiles


Team Foundation Server Training

As you can see, setting up a continuous integration server using Team Foundation Server is easy and flexible. To learn more about TFS you may be interested in Learning Tree course 1816, Agile Software Development with Team Foundation Server.


Doug Rehnstrom

What is Visual Studio Online?

The name “Visual Studio Online” might be misleading. Visual Studio Online is not an online version of Microsoft’s Visual Studio development tool. It is actually an online version of Team Foundation Server (TFS).

Visual Studio Online and Team Foundation Server are complete application lifecycle management tools. The advantage of Visual Studio Online over TFS is it is completely managed by Microsoft in the cloud. All you have to do is create an account and you’re off and running. Microsoft will manage the servers and do the backups for you automatically.

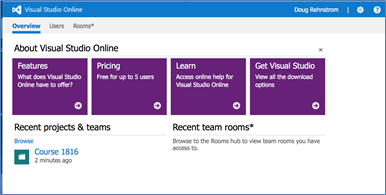
Once you have your account, you and your development team can create any number of projects. Each member of the team can utilize Visual Studio Online to help manage his or her work.


Visual Studio Online Home Page


Visual Studio Online for Analysts

Business analysts can use Visual Studio Online to enter work items and documentation. This documentation can be as detailed and sophisticated as needed. Customizable templates are included to make entering requirements consistent and simple. Documentation is formatted as html and external files like images and models can be added as attachments.


Work Item Input Screen


Visual Studio Online for Programmers

Programmers can utilize Visual Studio Online for source control, automated builds and integrated unit testing. Visual Studio Online integrates seamlessly with Visual Studio, and can be used from other development tools like Eclipse and Xcode as well. Multiple source control systems are supported out-of-the-box. Automated builds can easily be setup to compile the code, run all the unit tests, and even deploy the application to test servers.


Source Code Screen


Visual Studio Online for Testers

Testers can use Visual Studio Online manage user acceptance tests. Test scripts can be entered. A test runner is included for testers to enter the results. There is sophisticated reporting included to track tests over time.


Test Management Screen


Visual Studio Online for Managers

Managers can use Visual Studio Online to track team progress. Large projects can be divided into iterations. Work items can be scheduled within iterations and assigned to team members. Team members can easily enter their progress on work items assigned to them. The tool automatically creates product backlogs, Kanban boards and burndown charts.


Product Backlog


Kanban Board


Getting Started with Visual Studio Online

Getting started with Visual Studio Online is easy. There is nothing to install or setup as everything can be done within the browser. Visual Studio Online is even made available for free for teams of five or less. All you need to get started is a Microsoft account.


Go to the URL, http://www.visualstudio.com/products/what-is-visual-studio-online-vs for more information. Click the “Get started for free” link to set up your account.


Visual Studio Online and Team Foundation Server Training

You may also be interested in Learning Tree course 1816, Agile Software Development with Team Foundation Server which will get you and your team quickly up to speed using both Team Foundation Server and Visual Studio Online.

Doug Rehnstrom

Visual Studio 2013 GitHub Source Control

I posted here a while back on using GitHub with Visual Studio 2010. It was a fairly involved process using a third party plugin. Well now you can integrate with GitHub directly from Visual Studio, and it’s much, much easier. I used it yesterday to make my DataAnnotationValidator (blogged about here) available on GitHub for anyone who wants to use it – and, hopefully, so I can collaborate with others on developing it.

Although GitHub integration is now easier, it’s still a trek through unfamiliar and somewhat confusing screens, so I thought it might be helpful to put together a beginner’s guide to working with GitHub and Visual Studio 2013.

First things first – if you’re not already a member, join GitHub. Then you’re ready to begin. I happen to need to put together a little Web Forms / DynamicData demo for a customer, so I’m going to use that project as my example (and then take it down again so I don’t clutter up my GitHub page) .

I created an ASP.NET Web Application and ticked the ‘Add to source control’ box.

Then I chose Web Forms and got rid of authentication as I don’t need it for the little demo I’m putting together.

The next screen asks you what kind of source control you want. Obviously enough, the answer for us is Git:

Now you want to click on the Team Explorer tab under Solution Explorer.

That takes you to the following view and encourages you to download the command line tools. I’ll leave that up to you and focus on the Visual Studio integration:

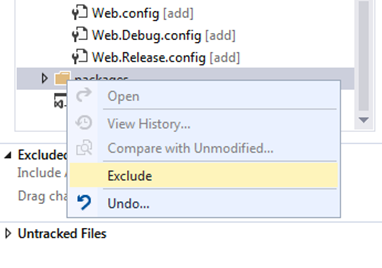
Now it’s time to setup what’s going to be stored on Git, and what isn’t. I see no point in storing the external packages, so I want to exclude them. Click on the Changes option and you see an interface which initially assumes everything is going to be stored on Git:

I selected the packages folder, right-clicked and chose exclude:


So now I have a list of included and excluded changes:

It’s time to enter a commit message and then click Commit… Except that you need to set up your email address and user name first:

Click on the Configure link and it takes you to a screen where you can enter your details. Notice, it also includes a couple of ignore rules for Git-related files:

So with that set up, we can fill in a commit message and commit our changes.

This commits them to our local repository, so we’ll get a dialog re. saving the solution:

And now we’re finally ready to sync with Git:

We click on the link to go to the Unsynced Commits page, and enter the URL of our destination repository:

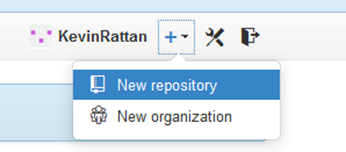
Except we don’t yet have a repository on GitHub. So next we need to open up a browser, go to GitHub, sign in and click on the Add | New Repository link.

I created a DynamicDataGitDemo public repository (as you have to pay for private ones, and I’m only really interested in GitHub for open source projects). I also chose not to add a ReadMe or a license just yet, as we want an empty repository for Visual Studio. We can always add a ReadMe and license later on.

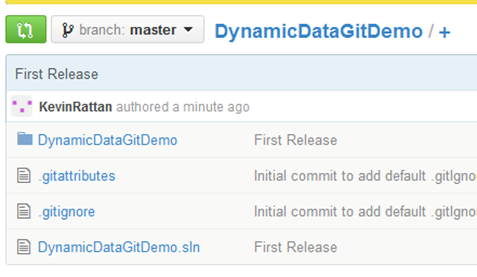
And finally we have a repository and we’re ready to upload our source code:

For that, we need the https link that’s available on this screen (and later, elsewhere in the interface).

So we copy that into Visual Studio and then press Publish:

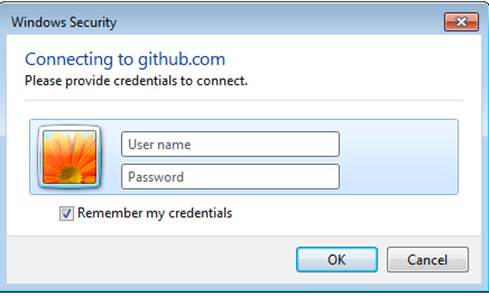
Which, not unsurprisingly, brings up a dialog asking us to provide our credentials (which we won’t have to do again if we allow it to remember them):

And that’s it. Enter your GitHub username and password, click OK, and your source code is saved to GitHub.

From that point on, you can push changes up from your local repository, or pull down changes from GitHub. On my DataAnnotationValidator project, I added a ReadMe file and a license via GitHub’s browser interface (the latter as a text file, as the tool only generates one on initial creation) and then used Visual Studio to pull them down to my local repository, as well as subsequently adding changes locally and pushing them back up.

Overall, it’s a lot less fiddly than it used to be – as are so many other things inside VS 2013.

Kevin Rattan

For other related information, check out these courses from Learning Tree:

Building ASP.NET Web Applications: Hands-On

Building Web Applications with ASP.NET MVC

Using Web Forms in an MVC Site

I’m teaching an HTML5 course this week, but one of my students had an ASP.NET question: how do you combine Web Form pages with ASP.NET MVC? It’s an interesting question, and not one that’s covered in any of our courses. Our MVC class covers MVC, our Web Form course covers Web Forms… and never the twain shall meet. But actually, combining the two is very straightforward, and can be very useful. ASP.NET MVC is great… but it doesn’t do grids anywhere near as easily or as well as Web Forms. And what if you have legacy Web Form pages that you want to include in your shiny new MVC site so that you don’t have to recreate absolutely everything on day one?

Here’s how you do it.

First, let’s build an MVC site. I created a standard MVC 4 site:

Using the Internet Application template and Razor syntax:

That gives a basic structure and sample controllers/views:

Now I want to add a nice grid to display a list of restaurants. I could do this the hard way with MVC, but why bother when I could use the Web Forms GridView?

So first I create a quick Entity Framework .edmx file for the table I want to display:

Then I add a Web Form to my site. That’s easy. Just right-click on the project and use Add | New Item….

Then I drag on a GridView…

And configure it to use an Entity Data Source pointed at the Restaurants entities, with some auto format goodness to make it purdy…

Then I add a link inside the layout view that points at my .aspx page (so NOT an MVC style route):

And when I click on it – tara! – I have a working Web Form page with a Grid inside an MVC application:

There is, of course, a catch. You can get some issues mixing the two forms of routing together (MVC logical routes and Web Form end points). The solution here is to tell MVC to ignore incoming routes that contain .aspx. You do this inside the RouteConfig in the App_Start folder:

And now we have an application that uses both ASP.NET technologies.

Of course, in the real world you’d have to worry about making your Web Forms look and feel like your MVC site, and there’s the whole thorny issue of keeping them in sync and how you can have a well-organized site with two different approaches to the UI…. But on the other hand, it’s nice to be able to take advantage of Web Forms where they can do things easily, and it makes migration from Web Forms to MVC much easier.

Kevin Rattan

For other related information, check out these courses from Learning Tree:

Building ASP.NET Web Applications: Hands-On

Building Web Applications with ASP.NET MVC

Supporting Multiple Versions of jQuery

I was in New York recently teaching my ASP.NET Web Forms class while one of my colleagues was teaching my jQuery class a couple of doors away. One of the students in the jQuery class asked an interesting question, and since another instructor – Randy Casburn – was sitting in the back of the room, he had some fun playing around with alternative answers. I thought the code he came up with might be useful to someone, so I’m posting it here – along with two other answers to the question: ranging from the officially recommended (but restrictive) to the deeply unofficial (but clever and very flexible).

Why might you want to do have multiple versions? There are all sorts of reasons:

  • You may be using a plugin that relies on an older version
  • As a developer, you may not have control over the whole page – just your portion of it – and other developers/teams may be adding their versions of jQuery elsewhere on the page. (This is particularly true if you have a complex server side set up, and your pages are built from different elements maintained by different developers/teams).
  • You may use a third party tool that relies on a particular version
  • A component may inject an older version of jQuery whether you want it to or not.

So – first, what are the official answers to the question?

Answer one: don’t do it, use the migration plugin.

The idea here is that you don’t run an older version of jQuery as well as a newer version, you use the migrate plugin to add backwards compatibility to your newer version (1.9+). First replace your old version of jQuery with the new one, then add a reference to the migrate plugin. As if by magic, the deprecated elements removed in the more recent version are restored and your existing code works:

<script src=”http://code.jquery.com/jquery-1.10.2.js”></script&gt;

<script src=”http://code.jquery.com/jquery-migrate-1.2.1.js”></script&gt;

Advantages: you only have one version of jQuery, and the plugin provides a migration path until you get around to updating.

Disadvantages: it only goes back as far as jQuery 1.6.4, so if you need to support an older version, it doesn’t help.

Answer two: use .noConflict()

The noConflict() method is designed to relinquish jQuery’s use of the $ alias so that jQuery can work alongside other JavaScript libraries. It works just as well when that ‘other’ library is an older version of jQuery, even if the jQuery team does not recommend having more than one version.

The following code….

<script
src=’http://code.jquery.com/jquery-1.6.min.js’></script>

<script
src=’http://code.jquery.com/jquery-1.7.2.min.js’></script>

<script>

    jQuery.noConflict();

/**

    Newer version code would be here

    Note: use of ‘on()’ method

**/

    jQuery(function(){

        jQuery(‘#new’).on(‘click’, function(e){

            e.preventDefault();

            jQuery(‘body’).append(‘You clicked on the “jQuery” link. It used version: ‘+jQuery.fn.jquery+‘<br/><br/>’);

        });

    });

/**

    Legacy code would be here

    Note: use of ‘bind()’ method

**/

    $(function(){

        $(‘#old’).bind(‘click’, function(e){

            e.preventDefault();

            $(‘body’).append(‘You clicked on the “$” link. It used version: ‘+$.fn.jquery+‘<br/><br/>’);

        });

    });


</script>

</head>

<body>

<a
id=’old’
href=’#’>Execute older version (jQuery as $)</a>

<br/><br/>

<a
id=’new’
href=’#’>Execute newer version (jQuery as jQuery)</a>

<br/>

</body>

Leads to the following output when both buttons have been clicked:

That’s nice if you need to support two versions of jQuery, one of which is older than 1.6.4. But what if you have a situation where you absolutely have to use more than two versions of jQuery side by side? Here is Randy’s solution:

Answer three: Alias, alias, alias

The solution here is to add the version of jQuery you want to use and assign it to a variable. Then add another version, and assign it to another variable. Repeat as necessary.

Here’s the code:

    <script
src=’http://code.jquery.com/jquery-1.3.pack.js’></script>

    <script>

    var $$$ = jQuery;

    </script>

    <script
src=’http://code.jquery.com/jquery-2.0.3.min.js’></script>

    <script>

    var $$ = jQuery;

    </script>

    <script
src=’http://code.jquery.com/jquery-1.6.min.js’></script>

    <script
src=’http://code.jquery.com/jquery-1.7.2.min.js’></script>


<script>

    jQuery.noConflict();

    $$$(function(){

        $$$(‘body’).append(‘/————-/<br>$$$ is version: ‘+$$$.fn.jquery);

        $$$(‘body’).append(‘<p>’ + testOnSupport($$$) + ‘</p>’);

    });

    $$(function(){

        $$(‘body’).append(‘/————-/<br>$$ is version: ‘+$$.fn.jquery);

        $$(‘body’).append(‘<p>’ + testOnSupport($$) + ‘</p>’);

    });


    jQuery(function(){

        jQuery(‘body’).append(‘/————-/<br>jQuery is version: ‘+jQuery.fn.jquery);

        jQuery(‘body’).append(‘<p>’ + testOnSupport(jQuery) + ‘</p>’);

    });

    $(function(){

        $(‘body’).append(‘/————-/<br>$ is version: ‘+$.fn.jquery);

        $(‘body’).append(‘<p>’ + testOnSupport($) + ‘</p>’);

        $(‘body’).append(‘/————-/<br>’);

    });

    function testOnSupport(x)

    {

     if (typeof (x(‘body’).on) == ‘undefined’) nope = ‘Does not support on()’; else nope = ‘Does support on()’;

     return nope;

    }


</script>

</head>

<body>

<br>

</body>

And here’s what the output looks like:

Do I recommend having multiple versions of jQuery side by side? Emphatically not. But if you have no choice in the matter, there are a surprising number of ways to get there. Whichever you use, do be careful of the order in which you add your references – if you’re using .noConflict() for example, you need to make sure you put your script files and the .noConflict() code AFTER any older version of jQuery injected by a component.

Kevin Rattan

For other related information, check out this course from Learning Tree:

jQuery: A Comprehensive Hands-On Introduction

Creating a Custom DNN Module and Integrating Captcha

I recently had a customer request to add a Contact Us form to their DNN installation. It’s something I hadn’t done for a while. In fact, it’s been so long that the language has changed. Last time I played around behind the scenes on DNN (or DotNetNuke as it then was), the language was VB only – this time, the installation is C#. It turned out to be a lot simpler than it was back then, and also gloriously easy to add captcha – another of the customer requirements, as they’re tired of receiving spam from online forms.

I’m guessing that this is something a number of the readers of this blog might need to do some time, so I thought I’d share the easy way to build a DNN form module that includes a captcha.

Getting DNN to Create the Module

The first step is to get DNN to create the Module for you. You’re going to do this twice – once on your development machine, and again on the live site.

I ran the development copy of the site from Visual Studio 2012 and logged in as the host. Then I did the following:

  1. Go to Host | Extensions

  1. On the Extensions page, select “Create New Module”

  1. In the dialog, there will initially be a single dropdown for “Create Module From”. Select “New”

  2. This will then open up more fields, and allow you to get DNN to do the hard work for you. You want to
    1. Define an owner folder – in this case I went with my company name as the outer folder
    2. Create a folder for this specific module – I’m creating a contact us form, so ContactUs seemed like a sensible name
    3. Come up with a name for the file and the module – I went with Contact for both, to distinguish the Contact module from the ContactUs folder.
    4. Provide a description so you’ll recognize what it is
    5. Tick the ‘create a test page’ option so you can check everything was wired up correctly

You can now close your browser and take a look at the structure DNN has created. We have a new folder structure underneath DesktopModules  – an outer Time2yak folder, and a nested ContactUs folder, complete with a Contact.ascx file:

If you open the web user control in the designer, this is what you get:

That’s given us a good starting point – but the first thing we’re going to do is delete the Contact.ascx user control. Just make sure you copy the value of the inherits attribute from the DotNetNuke.Entities.Modules.PortalModuleBase directive at the top of the ascx page before you delete it:

Creating the Web User Control

Now we’re going to create our own user control with a separate code behind page.

  1. Delete Contact.ascx and then right click on the folder and create a new Web User Control called Contact. This will recreate the ascx file, but this time with a code-behind file

  1. Change the definition of the code behind file so that it Inherits from DotNetNuke.Entities.Modules.PortalModuleBase (which is why you copied it).
  2. Now all you need to do is code the user control to do whatever you want it to do, just like any other ASP.NET Web Forms user control. I added a simple contact form with textboxes, labels, validation etc.:

  1. I then used DNN’s built in Captcha control. It’s easy to use, provided you don’t mind working in source view, rather than design (actually, I prefer source view, so this works well for me). You just need to
    1. Register the Control

    2. Add it to the page

    3. Check the IsValid property in the code behind (note the use of Portal.Email to get the admin email address).

Import the Module to the live site

This is the easiest part of all. Just use the same steps to create the module on the live server that you did in development, and then copy your version of contact.ascx over the version on the live site.  You now have the module in place and it appears in the modules list and can be added to any page you want:

And when you add it to the page, you have a Contact Us form with a captcha, developed as a DNN module:

The only other step is to use DNN to create the ThankYou.aspx page that the form passes through to – and that’s just a matter of using the CMS and doesn’t involve any coding.

Kevin Rattan

For other related information, check out these courses from Learning Tree:

Building ASP.NET Web Applications: Hands-On

Check Out Federal News Radio’s “Ask the CIO” Segment Sponsored by Learning Tree!

Learning Tree is proud to announce its sponsorship of Federal News Radio’s “Ask the CIO Segment!” Every Thursday morning at 10:30am, host Jason Miller interviews federal agency CIO’s about the latest directives, IT challenges and successes.

Catch this week’s segment with guest Sanjay Sardar, CIO of the Federal Energy Regulatory Commission, discussing FERC’s move to put mobility at the center of IT upgrades.


Learning Tree International

.NET & Visual Studio Courses

Learning Tree offers over 210 IT training and Management courses, including a full curriculum of .NET training courses.

Free White Papers

Questions on current IT or Management topics? Access our Complete Online Resource Library of over 65 White Papers, Articles and Podcasts

Enter your email address to subscribe to this blog and receive notifications of new posts by e-mail.

Join 29 other subscribers
Follow Learning Tree on Twitter

Archives

Do you need a customized .NET training solution delivered at your facility?

Last year Learning Tree held nearly 2,500 on-site training events worldwide. To find out more about hosting one at your location, click here for a free consultation.
Live, online training