Posts Tagged 'jQuery'

Supporting Multiple Versions of jQuery

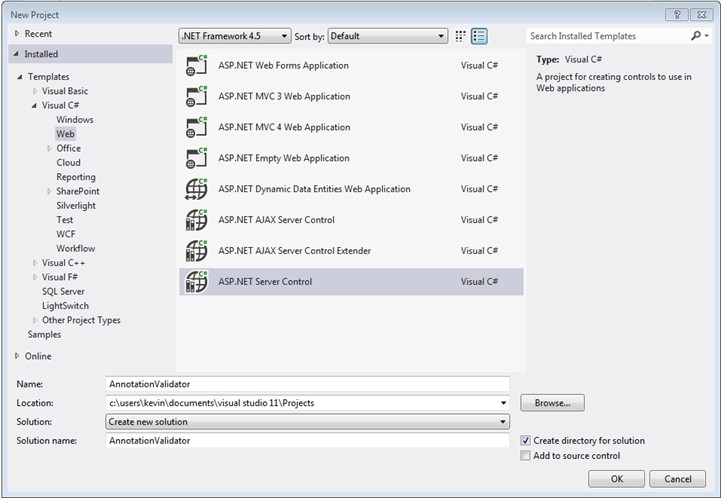
I was in New York recently teaching my ASP.NET Web Forms class while one of my colleagues was teaching my jQuery class a couple of doors away. One of the students in the jQuery class asked an interesting question, and since another instructor – Randy Casburn – was sitting in the back of the room, he had some fun playing around with alternative answers. I thought the code he came up with might be useful to someone, so I’m posting it here – along with two other answers to the question: ranging from the officially recommended (but restrictive) to the deeply unofficial (but clever and very flexible).

Why might you want to do have multiple versions? There are all sorts of reasons:

  • You may be using a plugin that relies on an older version
  • As a developer, you may not have control over the whole page – just your portion of it – and other developers/teams may be adding their versions of jQuery elsewhere on the page. (This is particularly true if you have a complex server side set up, and your pages are built from different elements maintained by different developers/teams).
  • You may use a third party tool that relies on a particular version
  • A component may inject an older version of jQuery whether you want it to or not.

So – first, what are the official answers to the question?

Answer one: don’t do it, use the migration plugin.

The idea here is that you don’t run an older version of jQuery as well as a newer version, you use the migrate plugin to add backwards compatibility to your newer version (1.9+). First replace your old version of jQuery with the new one, then add a reference to the migrate plugin. As if by magic, the deprecated elements removed in the more recent version are restored and your existing code works:

<script src=”http://code.jquery.com/jquery-1.10.2.js”></script&gt;

<script src=”http://code.jquery.com/jquery-migrate-1.2.1.js”></script&gt;

Advantages: you only have one version of jQuery, and the plugin provides a migration path until you get around to updating.

Disadvantages: it only goes back as far as jQuery 1.6.4, so if you need to support an older version, it doesn’t help.

Answer two: use .noConflict()

The noConflict() method is designed to relinquish jQuery’s use of the $ alias so that jQuery can work alongside other JavaScript libraries. It works just as well when that ‘other’ library is an older version of jQuery, even if the jQuery team does not recommend having more than one version.

The following code….

<script
src=’http://code.jquery.com/jquery-1.6.min.js’></script>

<script
src=’http://code.jquery.com/jquery-1.7.2.min.js’></script>

<script>

    jQuery.noConflict();

/**

    Newer version code would be here

    Note: use of ‘on()’ method

**/

    jQuery(function(){

        jQuery(‘#new’).on(‘click’, function(e){

            e.preventDefault();

            jQuery(‘body’).append(‘You clicked on the “jQuery” link. It used version: ‘+jQuery.fn.jquery+‘<br/><br/>’);

        });

    });

/**

    Legacy code would be here

    Note: use of ‘bind()’ method

**/

    $(function(){

        $(‘#old’).bind(‘click’, function(e){

            e.preventDefault();

            $(‘body’).append(‘You clicked on the “$” link. It used version: ‘+$.fn.jquery+‘<br/><br/>’);

        });

    });


</script>

</head>

<body>

<a
id=’old’
href=’#’>Execute older version (jQuery as $)</a>

<br/><br/>

<a
id=’new’
href=’#’>Execute newer version (jQuery as jQuery)</a>

<br/>

</body>

Leads to the following output when both buttons have been clicked:

That’s nice if you need to support two versions of jQuery, one of which is older than 1.6.4. But what if you have a situation where you absolutely have to use more than two versions of jQuery side by side? Here is Randy’s solution:

Answer three: Alias, alias, alias

The solution here is to add the version of jQuery you want to use and assign it to a variable. Then add another version, and assign it to another variable. Repeat as necessary.

Here’s the code:

    <script
src=’http://code.jquery.com/jquery-1.3.pack.js’></script>

    <script>

    var $$$ = jQuery;

    </script>

    <script
src=’http://code.jquery.com/jquery-2.0.3.min.js’></script>

    <script>

    var $$ = jQuery;

    </script>

    <script
src=’http://code.jquery.com/jquery-1.6.min.js’></script>

    <script
src=’http://code.jquery.com/jquery-1.7.2.min.js’></script>


<script>

    jQuery.noConflict();

    $$$(function(){

        $$$(‘body’).append(‘/————-/<br>$$$ is version: ‘+$$$.fn.jquery);

        $$$(‘body’).append(‘<p>’ + testOnSupport($$$) + ‘</p>’);

    });

    $$(function(){

        $$(‘body’).append(‘/————-/<br>$$ is version: ‘+$$.fn.jquery);

        $$(‘body’).append(‘<p>’ + testOnSupport($$) + ‘</p>’);

    });


    jQuery(function(){

        jQuery(‘body’).append(‘/————-/<br>jQuery is version: ‘+jQuery.fn.jquery);

        jQuery(‘body’).append(‘<p>’ + testOnSupport(jQuery) + ‘</p>’);

    });

    $(function(){

        $(‘body’).append(‘/————-/<br>$ is version: ‘+$.fn.jquery);

        $(‘body’).append(‘<p>’ + testOnSupport($) + ‘</p>’);

        $(‘body’).append(‘/————-/<br>’);

    });

    function testOnSupport(x)

    {

     if (typeof (x(‘body’).on) == ‘undefined’) nope = ‘Does not support on()’; else nope = ‘Does support on()’;

     return nope;

    }


</script>

</head>

<body>

<br>

</body>

And here’s what the output looks like:

Do I recommend having multiple versions of jQuery side by side? Emphatically not. But if you have no choice in the matter, there are a surprising number of ways to get there. Whichever you use, do be careful of the order in which you add your references – if you’re using .noConflict() for example, you need to make sure you put your script files and the .noConflict() code AFTER any older version of jQuery injected by a component.

Kevin Rattan

For other related information, check out this course from Learning Tree:

jQuery: A Comprehensive Hands-On Introduction

New ASP.NET Training Course at Learning Tree

I was back in Learning Tree’s Reston offices last week, presenting the beta of my new ASP.NET course – Building ASP.NET Web Applications: Hands-On.  (The beta is part of our course development process where we try out the course in front of students for the first time.  Their feedback is an important part of refining exercises and slides to make sure that everything is clear, that all the exercises work as written and that we have the right balance of material).

I’ve been busy writing the course over the past few months, which is why this blog went very quiet for a while. The new course takes you all the way from explaining What is ASP.NET? through to building a multi-layer application using Code-First Entity Framework, the Web API and the HTML5 Geolocation API. (I put the course example online, so if you want to see what we build during the week, check out www.learningtreatz.com).

What’s so exciting about the new course? (Apart from the fact that I wrote it, of course…)

Well… there’s Visual Studio 2012….

A lot of people aren’t keen on the new monochrome look and – horrors – capitalized MENU items – but there are some really nice new features like Page Inspector and the new improved Add Reference dialog. Beyond that, it remains a very powerful development environment that makes web development a pleasure. And it means, of course, that we can develop with .NET 4.5 – and that means access to a host of cool new features. There’s the Web API:

And bundling & minimizing – which both reduces the size of your .css and .js files for production and makes sure that all your small files are combined into a single  large file, which is a big help in reducing download times for the client:

And there’s also out-of-the-box support for HTML5…

The class covers all these and more, and takes attendees from creating a simple Web Form at the beginning of the class right through to building a layered application with a Code-First Entity Framework data access layer, a business layer calling IQueryables in the data access layer and a UI that uses everything from combining Model Binding with the ListView through to providing an alternative jQuery Mobile view of the entire web site. So if you’re new to ASP.NET Web Forms or just want to refresh your skillset, why not give it a try!

This is me in full flow at the front of the class…

And helping an attendee with one of the exercises…

Kevin Rattan

For other related information, check out this course from Learning Tree:

Building ASP.NET Web Applications: Hands-On

Uploading to GitHub from Visual Studio

For a while now, my friend and fellow Learning Tree instructor Nigel Armstrong has been urging me to put my jQuery ratings plugin (jquery.rate) on GitHub. So today I finally decided to do something about it. I found it considerably more complicated than I expected – sufficiently so that I thought it might be useful to share the how-to with others and help them learn from my pain.

What I wanted was to upload files directly from Visual Studio to GitHub without having to mess around on the command line. I managed it… eventually. Here is what you need to do if you want to do the same.

First, join GitHub if you’re not already a member. This is the easy part! Once you’re a member, it’s trivial to create a new repository – just click on the link in the top right hand corner and follow the instructions

You’ll end up creating a simple .md documentation file that appears on the home page of your repository and tells people about it:

Okay – so that part was easy. Now the difficult part – getting the files you want into your repository from Visual Studio. The first thing you need to do is download and install the Git extensions – including installing the software dependencies if you don’t already have them on your machine. This will give you all the base things you need.

When it runs, it will come with a settings window which will initially have some red bars until you fill in all the necessary settings such as your email address):

Once that’s set up, you have to create a public/private key pair. You’re going to save the private key locally and upload the public key to GitHub. This is where it gets confusing. You’d think the key would be part of your setup, but it’s not. You need to run the actual Git Extensions GUI in order to set up your keys. It looks like this:

You need to click on the Remotes link at the top and then select PuTTY | Generate or import key.

You then get a dialog that asks you to move your mouse over the blank area to create randomness:

Once it’s complete, you are given the public and private keys. You need to save the private key somewhere safe (and passphrase protect it through the dialog) and you need to select and copy the public key with CTRL+C.

Now you’re ready to go back to GitHub and install the public key so you can connect to the repository using SSH. Log in to GitHub and click on the account link in the top right corner:

Then you need to click on SSH Keys in the menu, paste your public key into the form and give the key a name.

Phew! Now we’re ready for the next step – Visual Studio integration.

First, you need to download and install the Visual Studio Git Source Control Provider Extension. The best way to do this is via Tools | Extension Manager.

Once you have it installed, you can start using Git within Visual Studio. You’ll see the Git menu item. Go to your project and select Initialize new Repository.

This will open a dialog. Click on the Initialize button and you’ll see the Git tool, which I’ve docked below my main window here:

Then we need to set up our remote repository. Go back to that Git menu item and select Manage remotes.

That brings up this dialog – it’s asking for the URL of your repository.

Go back to your repository page on GitHub and select the SSH tab.

That will give you an SSH link in the textbox. Grab it and paste into the dialog

We’re almost done with connecting now, but if you click on the Test connection button at this point, you aren’t going to like what you see – a message telling you the host does not exist:

The trouble is we haven’t loaded our key yet. So now you browse for your private key and click the Load SSH button – somewhere along the line you’ll be asked to enter the passphrase you created earlier. Now when you test your connection, you’ll get something altogether more helpful and you’ll be asked if you want to cache the public key: enter y to do so, n to leave it uncached:

So now we can go ahead and start uploading stuff to the repository. The tool that I docked at the bottom of Visual Studio had a commit link. That should do it, right?

So, you click the checkbox beside the things you want to upload (in my case, the .js file and a zip with the samples/images etc.) and then click commit… and nothing happens. You need to push as well. So you right-click on the project in Solution Explorer and select Git | Push.

And it doesn’t work. The problem is, you haven’t downloaded the .md file that’s already in the repository, so you’re not synchronized. So, try again, but this time click on Pull instead of Push. That will download the .md file (though you won’t see it in Visual Studio unless you click on the refresh icon at the top of Solution Explorer). Now you’re ready to upload files by going back, selecting and committing them and then trying Push again. I also took the opportunity to enhance the .md file by adding a little more information and a link to the online samples. I made the changes insides Visual Studio:

Then I went through the commit- Push process again, and here is the revised file on GitHub:

So – simple, huh? Well, maybe not. But hopefully it will be a bit simpler for you than it was for me, now that I’ve written this blog post! And if you’re interested in downloading the plugin from GitHub: here it is.

Kevin Rattan

For other related information, check out this course from Learning Tree:

Building ASP.NET Web Applications: Hands-On

jQuery: A Comprehensive Hands-On Introduction

Web Forms Data Annotation Validation – Part 2

In my last post I reviewed the new Web Forms support for server-side validation using Data Annotations, and ended with my frustration at not being able to find out how (or if) Microsoft had implemented the matching client-side validation. I promised to look at two different implementations that would provide client-side validation. This post is an overview of my first pass at a solution–using the jQuery validation plugin.

My hope was that since Microsoft had implemented client-side validation in MVC, all I would have to do was rip the code out of an MVC template and tweak it a bit to make it work in Web Forms. Sadly, it wasn’t going to be as easy as that. I brought over the appropriate JavaScript files, tried adding the web.config settings, but nothing happened. Still, at least I had the MVC JavaScript files and that meant I had the jquery.validate plugin – and since I’ve used that to get around issues in MVC validation, I could do so again for Web Forms. All I had to do was read the Data Annotations in a custom validator and inject the appropriate rules into the control to be validated. So… here goes:

The first thing I did was create a new ASP.NET server control so that the validator would be just another control in my toolbox:

New project dialog

Then I added a new class and inherited from the base validator:

inheriting base validator

That meant implementing the single method EvaluateIsValid():

overriding EvaluateIsValid

I simply return true here because the validator isn’t actually going to do any validation–it’s just going to inject the rules into the form element so that the validate plugin can do that for me. The validate plugin is able to read validation rules out of HTML class attributes. I’m going to translate DataAnnotations into the object literal arguments the plugin expects, so that when the validator reads the following Data Annotation…

Data Annotations

….it generates “{required:true, messages:{‘The from address is required’}}“inside the class attribute:

generated html

(In order for this to work, I’ll have to add the metadata plugin to my master page, as well as the validate and validate.unobtrusive plugins that I “borrowed” from the MVC template).

I’m not going to render this control itself, just inject content into the control it’s validating, so I override the PreRender event. I do the work inside the event handler (and inside a check to see if IsPostBack is false so that I’m only inject my code once). I even commented out the call to base.OnPreRender. Why bother? I’m not going to render it.

onprerender

The first task is to read the Data Annotations, so I need a reference to System.ComponentModel.DataAnnotations. Now I can use reflection to read the annotations, thus:

reflection

As you can see, I’m using TypeName, TypeAssembly and TypeProperty properties on my class to provide all the information I need to get hold of the object and its Data Annotations. These need to be provided by the UI developer, thus:

DataAnnotationValidator in aspx source

Now it’s just a question of checking the type of the validation attribute and creating the appropriate string. I did this by building two collections–one of rules, the other of messages. Here are the collections and a method used to populate them:

properties

And here is a switch inside the loop through the attributes that calls the AddValidation() method:

switching attributes

Once I have set up the rules and messages, all I need to do is create the literal and inject it into the control.

building the string

Then it’s time to test it… and nothing happens. That’s because although the validate plugin is there, there’s no call to .validate() on the page. So now I need to add in a scriptlet to make the plugin runs:

scriptlet

And then I need to register that script on the page.

registering script

Phew! Finally we’re done. All I have to do is add a reference to the library, add the DataAnnotationValidator to the toolbox (right-click and choose items, then browse to the library) and then add the appropriate validators to the page and give them the right property settings:

property settings

The DataAnnotation validator translates the rules into a form understood by the validate plugin, the validation runs and we have client-side validation:

working validation

Obviously, there are a lot of things that can be improved in this version. It doesn’t cover all the possible Data Annotations. It doesn’t allow for missing error messages. It only validates TextBox controls. I could improve it, but I’m not going to: I decided I didn’t like the dependency on the metadata plugin, and I hated having to inject JavaScript into the page. So I decided to go back to square one, forget about bringing in any scripts from the MVC version and work with the unobtrusive validators that come with the Web Forms template instead. And that’s what I’m going to cover in my next post.

(If you’re interested in the full code for this version of the DataAnnotation validator, it’s online here: DataAnnotation.txt.)

Kevin Rattan

For related information, check out these courses from Learning Tree:

Building Web Applications with ASP.NET and Ajax

jQuery: A Comprehensive Hands-On Introduction

Managing jQuery Mobile and ASP.NET MVC Compatibility Issues

jQuery Mobile is a great technology for producing mobile-friendly applications that work on multiple devices.

ASP.NET MVC is a great technology for creating elegant, scalable Web applications.

The two were made for each other: so much so that the Visual Studio 11 beta includes jQuery Mobile along with ASP.NET MVC and even provides a specific mobile template.

Sadly, however, jQuery Mobile and ASP.NET MVC don’t always play nicely together.

I was reminded of this forcefully last night when I uploaded the latest version of my personal website, Cocktails-R-Us (which I’ve now upgraded to ASP.NET MVC 4). The problems tend come down to two things: IDs and AJAX–and sometimes both together.

One issue that bit me this time around was an incompatibility between jQuery Mobile and the ASP.NET authentication framework. I tested the new version locally and everything worked. Everything seemed fine on the live server as well, until I tried to log in using a mobile browser and this happened:

screen grab of error

The problem was a simple one. JQuery Mobile uses AJAX navigation unless you tell it otherwise. The ASP.NET authentication system issues 302 redirects which are no problem to normal requests, but cause issues with AJAX. So the answer is to turn off AJAX. For that, all you have to do is add the attribute data-ajax=”false” to the <a> tag – which means doing the following in ASP.NET MVC:

code sample

A related problem with mixing jQuery Mobile and ASP.NET MVC is the very different assumptions each makes about how you will use the ID attribute.

One of the best things about jQuery Mobile is the elegant, animated page transitions. And one of the worst things about jQuery Mobile is the price you have to pay for them. The animated page transitions work by adding the new page into the existing DOM. That means that while only one page is visible at a time, the content of multiple pages is in the DOM simultaneously.

Now, it’s not as bad as it sounds. JQuery Mobile is not putting the entire page into the DOM – just the part you’ve identified as the content of the page. But it still leads to problems with IDs.

Let’s imagine that a user is going through a sequence of HTML forms that map to ASP.NET MVC controller methods. In those methods, the HTML form is automatically translated into an Entity. And let us assume that each of these entities has a Name property (in my case, for example, Cocktails, Beverages and Ingredients might have the Names ‘Old Cuban‘, ‘Rum’, ‘Mint’). The HTML forms would contain id=”Name” for each of these textboxes. Those IDs would work with validation (as we don’t have repeating forms on the same page) and everything would be fine. Except that with jQuery Mobile’s default behavior, the forms would all exist inside the current DOM, and we would end up with multiple repeating IDs and badly formed HTML.

A jQuery Mobile purist would no doubt say – well, just don’t use the IDs: you could manage without them on the client. Well, yes you could – but that would involve doing a lot of work on the server to reproduce behaviors that are given to you ‘out of the box’ with the MVC framework. The alternative is to turn off the nice AJAX transitions for pages with HTML forms. Unless, of course, you prefer to write your own Model Binder and/or View Engine for ASP.NET MVC to get around the problem.

Personally, I think I’ll just turn off the AJAX.

Kevin Rattan

For related information, check out these courses from Learning Tree:

jQuery: A Comprehensive Hands-On Introduction

Building Web Applications with ASP.NET MVC

Improving Performance with Output Caching

I’ve been spending most of my spare time over the past few weeks refactoring the code for my site, cocktailsrus.com, in the Visual Studio 11 beta–partly to play with the new stuff, but mostly just to replace my original quick-and dirty back end with something more elegant. With the process pretty much complete, the new version of the site will be much more maintainable, as well as more performant and scalable. And I don’t know about you, but whenever I see those two words together, the first thing that leaps to my mind is “caching.”

Caching is a fantastic way of reducing the amount of data access on a website. Unfortunately, it can also be a fantastic way of tying yourself in knots and serving the wrong data to the wrong user. It is just too easy to serve stale data–especially when you transition from a single server to a web farm. So which type of caching to use, and how to avoid serving stale data?

ASP.NET offers two types of caching:  data caching and output caching. Data caching is managed programmatically. Output caching is managed via attributes (MVC) or page directives (Web forms).

Historically, I’ve preferred data caching. I’ve specialized in content management systems over the years, and it’s a very rare situation where a CMS delivers the same content to everyone. Data caching allows very fine-grained control. Unfortunately, it doesn’t play very well with Web farms–at least, not since Microsoft removed some of the core SQL Server technologies that allowed it to do so.

So, given that I want to be able to scale up to a Web farm, the question I asked myself was, Could output caching help my application?

The obvious candidate for output caching is the page that displays individual cocktails. These don’t change very often, and are amongst the most heavily trafficked on the site. Also, and most significantly, retrieving a cocktail from the database involves a complex SQL query with many table joins. (A cocktail has multiple ingredients, related cocktails, an author, etc.) The fewer such calls I make, the better.

On the face of it, caching the individual cocktails should be easy. Each one has a unique ID, so you should need to do is add an OutputCache directive, like this:

output cache directive

Looks easy, doesn’t it? Each time the method is called, the individual cocktail will be cached by its ID for 60 seconds.

Unfortunately, it really isn’t as simple as that. This caching will work–but it will deliver the same version of the output to everyone: mobile device users, AJAX users, non-AJAX users…. You get the picture. A user with JavaScript enabled will suddenly find that they are getting the full page rather than an AJAX payload, leading to pages within pages, like this:

page within page screengrab

So simple caching won’t do. We’re going to need to cache four different versions for each cocktail, specifically:

  1. Mobile with no AJAX
  2. Mobile with AJAX
  3. Standard with no AJAX
  4. Standard with AJAX

Unfortunately, there isn’t a querystring parameter that’s going to allow us to make that distinction, so it’s time for a custom parameter.

The first thing we have to do is override the GetVaryByCustomString() method in the global.asax. Here, we can use the request to filter our caching into the four different groups. The site uses jQuery, and jQuery AJAX requests use the “X-Requested-With” header, so we can use that to determine if this was an AJAX request. That’s half of the problem solved. We can then use the underlying infrastructure (or, perhaps, our own version of it) to find out if this request came from a mobile device.

GetVaryByCustomString code

We then assign this to the controller method and we should have something that caches multiple versions and returns the appropriate version from the cache:

VaryByCustom argument

Which is great… except that when we look at it in Firefox, we have the same old problem:

second page within page screengrab

The issue here is where the caching is happening. Output cache is a clever beast, and it’s automatically offloading the work to the client–which is a great idea, but means that if our client switches from AJAX to non-AJAX versions, we end up delivering the wrong item from cache.

Fortunately, there is a simple solution. The OutputCache attribute accepts a Location argument, which you can use to tell it to cache on the server rather than the client:

Corrected OutputCache attribute

So now I have a caching system that will work happily on a Web farm, significantly reduce data access and provide the appropriate custom view to the client.

Kevin Rattan

For related information, check out these courses from Learning Tree:

Building Web Applications with ASP.NET MVC

Building Web Applications with ASP.NET and AJAX

jQuery: A Comprehensive Hands-On Introduction

Managing Screen Updates When Loading UI Controls Using Ajax

I came across an interesting problem recently while working on www.cocktailsrus.com. I was adding a new rating system allowing members to rate cocktails on a scale of 1-5. I wanted to do something that was accessible, but also visually appealing and appropriate, so that this:

radio buttons

could easily and accessibly be converted into this:

rating plugin with images

The answer, of course, was to write a jQuery plugin that would be called on document.ready() and convert the default radio-buttons to active images – but only for users who have JavaScript enabled. I duly wrote the plugin, and it does everything I intended (e.g. you can customize the images, change the maximum number on the scale etc.). It’s free for anyone to use, and you can download it here.

However, during testing I came across a problem. The site makes extensive use of Ajax, and when the partial page downloads to the client the radio buttons are briefly visible before being replaced by the images. The problem is that the screen is being updated before document.ready() runs.

The obvious solution is to use a callback. I use two different Ajax methods – the built-in jQuery .load() method and .ajaxSubmit() (part of the jquery form plugin). Both have callbacks that run when the Ajax call returns, like this:

$(‘article’).load(url, function () {

$(‘#ScoreSection’).rate();

});

Unfortunately, while this looked like a promising solution, the problem remained: there is a perceptible delay between the DOM updating and the callback running. Once again, the user sees the radio-buttons briefly before they are replaced. So how to fix the problem?

The answer lies in an old animation technique – make the change off-screen and only make it visible after it has completed. In this case, that means:

  1. Use jQuery to create an empty div element and assign the result to a variable
  2. Assign the return from the Ajax call to the variable
  3. Run the plugin against the updated variable
  4. Update the DOM with the variable

With .load():

var $temp = $(‘<div />’);

$temp.load(url, function () {

   $(‘#ScoreSection’, $temp).rate();

   $(‘article’).html($temp);

});

With .ajaxSubmit():

var $temp = $(‘<div />’);

$form.ajaxSubmit({ target: $temp,

   success: function () {

     $(‘#ScoreSection’, $temp).rate();

     $(‘article’).html($temp);

}

});

Using this technique, the images replace the radio-buttons before they become visible, even when using Ajax. For an extra refinement, add a test inside document.ready() to make sure that the original method is only invoked if the Ajax callback has not already run. In this case, that’s a simple matter of testing the visibility of the radio-buttons, and only running the .rate() method if they’re visible.

Kevin Rattan

For other related information, check out these courses from Learning Tree:

jQuery: A Comprehensive Hands-On Introduction

Building Web Applications with ASP.NET and Ajax

Building Web Applications with ASP.NET MVC

Validating That At Least One TextBox Has Content

I came across an interesting little validation problem on my current project. The site is for members only – and in order to become a member, you need to be nominated. You can provide either one or two nominators, but you must provide at least one.

So how to force users to enter text in either of two TextBoxes? RequiredFieldValidators won’t do, because either one can be left empty. Yet at least one must be completed. Clearly this is a job for CustomValidators.

The client-side and server-side code are both fairly straight-forward, but I thought someone out there might find it useful, so here it is.

First of all, the CustomValidators in the ASPX page:


<asp:CustomValidator ID=”Nomination1CustomValidator” runat=”server” Display=”None” ValidateEmptyText=”true” ClientValidationFunction=”CheckNominations” ErrorMessage=”At least one nomination must be provided” ControlToValidate=”Nominated1TextBox” OnServerValidate=”Nomination2CustomValidator_ServerValidate”></asp:CustomValidator>


<asp:CustomValidator ID=”Nomination2CustomValidator” runat=”server” Display=”None” ValidateEmptyText=”true” ClientValidationFunction=”CheckNominations” ErrorMessage=”” ControlToValidate=”Nominated2TextBox” OnServerValidate=”Nomination2CustomValidator_ServerValidate”></asp:CustomValidator>

Note the empty ErrorMessage in the second validator. Combined with display=”none’, that means our ValidationSummary control is only going to display one error message to the user, making it much less confusing. Also notice that ValidateEmptyText is set to true – otherwise, our code will never run.

Then the JavaScript. We’re validating two controls, so even though we use the standard signature the validators are expecting, we’re only interested in the args. I set the TextBoxes’ ClientIDMode to static and used jQuery to get the controls.  (I use jQuery for pretty much all my client-side code).

function CheckNominations(sender, args) {
  if ($(‘#Nominated1TextBox’).val() == “”
      && $(‘#Nominated2TextBox’).val() == “”) {
        args.IsValid = false;
  }
   else {
args.IsValid = true;

   }

}

And, of course, we also need to implement the server-side code for a complete solution:

If String.IsNullOrEmpty(Me.Nominated1TextBox.Text) And
String.IsNullOrEmpty(Me.Nominated2TextBox.Text) Then
        args.IsValid = False
Else
        args.IsValid = True
End If

So now the user must fill in one of the TextBoxes, but can pick either one.  I have been using ASP.NET MVC a lot recently, and it’s nice to go back to Web Forms and see how very easy it is to take built-in controls like the custom validator and use them to meet your specific needs.

Kevin Rattan

For related information, check out these courses from Learning Tree:

Building Web Applications with ASP.NET and Ajax

jQuery: A Comprehensive Hands-On Introduction

How To Post To A Remote Server From An ASP.NET Web Form

I recently came an across an interesting problem: I had to post an ASP.NET Web Form to a third party Web site. It turns out to be quite a tricky thing to do – so I thought I’d share my solution with you in case you ever need to do the same thing.

First off: why did I want to post on rather than back?

I am in the process of taking over responsibility for an existing Web site. The site integrates with a bank to take credit cards – and the data needs to be posted.

So why not just use HttpWebRequest?

Because the user has to leave the site, pay and then come back – bringing return parameters back with them.

Ok – so how did the current site work?

It cheated. It’s an ASP.NET Web Forms site, but the page that does the posting is actually PHP!

So – what exactly is the problem with just switching to an ASP.NET Web Form?

Actually, there are several:

  1. ASP.NET Web Forms post back to the same page (or, at a pinch, to other pages on the same server). They don’t post on to third party web sites.
  2. The remote server requires set names for the posted fields – and ASP.NET Web Forms changes these on the client. This problem had two sub-problems:
    1. I had to use runat=”server” controls because the values were dynamic, and
    2. It turns out that ClientIDMode=”Static” fixes IDs, but not names

Q: So how did I make it work?

A: By using jQuery

Here’s what I did:

  1. Added a label telling the user that they needed JavaScript to pay by credit card (or they could pay by bank instead)
  2. Hid the label using jQuery, then showed a button (input type=”button”, not submit) and set its click event to….
  3. Rewrite the form’s action so that it posted to the remote address
  4. Rewrite the control names so that they met the remote sites requirements.
  5. Remove the unwanted form elements such as __VIEWSTATE
  6. Submit the form

Then all I had to do was test it – which I did by creating a page to echo the newly posted values back to the (which also meant I had to set EnableViewStateMac=”false” on the test page).

Here is the JavaScript:

$(function () {
$(‘#needJavaScript’).hide();
$(‘#buttonSubmit’).show().click(function () {
$form = $(‘form:first’);
$form.attr(‘action’, “test.aspx”);
$(‘#__VIEWSTATE, #__EVENTTARGET, #__EVENTARGUMENT’).remove();
$(‘input:hidden’).each(function () {
var original = $(this).attr(‘name’);
var improved = original.substring(original.lastIndexOf(“$”) + 1, original.length);
$(this).attr(‘name’, improved);
});
$form.submit();
});
});

So there you have it – a way to post to a remote server from an ASP.NET Web Forms Web site.

Kevin Rattan

For other related information, check out these courses from Learning Tree:

Building Web Applications with ASP.NET and Ajax

jQuery: A Comprehensive Hands-On Introduction

HTML5 Training Course At Learning Tree

I’m in Reston this week, attending our new HTML5 class. The author, Andrew Andrews III is also teaching it this week, and it’s a lot of fun. Andrew’s the Technical Editor on my jQuery course so I know him pretty well – and I’ve been looking forward to the class for a while.

What is HTML5?

It depends on who you ask. The W3C has one view. The WHATWG has another. Essentially, W3C likes to nail down a version of a specification and then move on tidily to the next one. WHATWG takes the view that HTML is continually evolving. Either way,  HTML5 is a mix of new HTML elements (e.g. article, header, footer), lots of new  functionality (e.g. geolocation, native graphics and audio/video) and a JavaScript API.

Why should you care?

Because if you’re waiting for HTML5 to be finished before you start using it, you’re going to find yourself waaaaay behind the curve. ASP.NET MVC already supports HTML5. ASP.NET Web Forms will be supporting it next release. And you can  download an update to Visual Studio 2010 to allow it to validate HTML5 as well as earlier versions.

Andrew at the front of the class

Andrew Andrews III teaching in Reston

Andrew is very keen to stress that you can use HTML5 right now. HTML isn’t, and never will be, a finished specification. Browsers are continually being updated to add support for new features. The trick is to do use the new features in a way that is backwards compatible.

Here, for example, is what my HTML5 Web site cocktailsrus.com should look like in a modern browser:

correct look and feel cocktailsrus.com

And here is what it looks like in Internet Explorer 8, if I don’t do anything to make the site backwards compatible:

old browser look and feel

And here is what it can look like if I follow Andrew’s approach. It’s not identical to the look in an up-to-date browser, but it’s a much more graceful degradation:

corrected old browers version

The change was accomplished with just a few lines of HTML and CSS – and it means you can take advantage of the latest features of HTML without having to sacrifice support for legacy browsers.

So there’s no excuse for avoiding HTML5 any longer. You can use a lot of it right now on all the main browsers, providing better-looking, more functional sites for your users. And if you want to know how to do it without giving up on older browsers… then go along to Andrew’s class!

Andrew assisting students on an exericse

Andrew helping students with an exercise

Kevin Rattan

For other related information, check out these courses from Learning Tree:

HTML5: Next Generation Web Development

jQuery: A Comprehensive Hands-On Introduction


Learning Tree International

.NET & Visual Studio Courses

Learning Tree offers over 210 IT training and Management courses, including a full curriculum of .NET training courses.

Free White Papers

Questions on current IT or Management topics? Access our Complete Online Resource Library of over 65 White Papers, Articles and Podcasts

Enter your email address to subscribe to this blog and receive notifications of new posts by e-mail.

Join 29 other subscribers
Follow Learning Tree on Twitter

Archives

Do you need a customized .NET training solution delivered at your facility?

Last year Learning Tree held nearly 2,500 on-site training events worldwide. To find out more about hosting one at your location, click here for a free consultation.
Live, online training